Monday 30 October 2017

Star Wars Snowspeeder - Bandai 1/48 Scale Plastic Model Kit [Completed]

A sense of awe and wonderment is etched into my childhood memories of time spent poring over images of the Industrial Light & Magic (ILM) crew at work. These behind-the-scenes model makers were, dare I say it, chief contributors to the success of the Star Wars franchise. For sure the efforts of ILM's cameraman, optical technicians, etc. are all necessary components of a whole. But at its core, the original Star Wars trilogy was all about the models and how it could transport viewers (young and impressionable or otherwise) into a universe in a galaxy far, far away.  

Wedge Antilles in the pilot's seat of an modified Incom T-47 Airspeeder
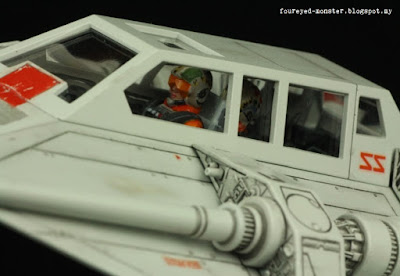
What about Wes Janson? Well he's in the cockpit too albeit seated on the back gunnery seat

So here I am, four decades since those days of wide-eyed innocence, still trying to recreate that feeling through scale model kits. Not in a million years could I ever hold a candle to these model-making geniuses. Attempts to mimic what they had done in the past is just the sincerest form of flattery on my part. A homage to the greats of ILM Model Shop if you will.   

Wedge in a money shot moment ala Lt.Pete "Maverick" Mitchell
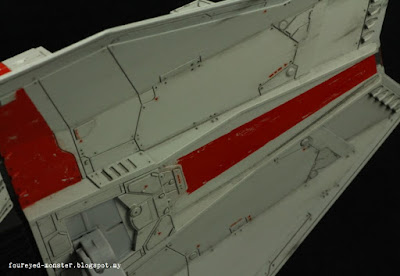
Upper left air brake flap deployed ... initiate banking turn to the left

I have often repeated this personal modelling mantra, perhaps once too often, that a scale model kit is only as good as its figures. To me everything falls apart if the miniature figurines aren't given their due. In many cases, more time and effort is actually given to the figures than the vehicle itself. A slight bias on my part? That's likely because figure painting is my strong suit. But it's undeniable that in general, one's eye will always be drawn to the figures first before panning to their surroundings. So it shouldn't come as a surprise that painting Wedge and Wes was the most time consuming for me.      

Now this is getting silly ... another shot of Wedge? Thought Janson as he fiddled with the tow cable controls.
Lower hull exposed as the snowspeeder banks to the left
Finally, a photographic closeup of Wes "Good Shot" Janson
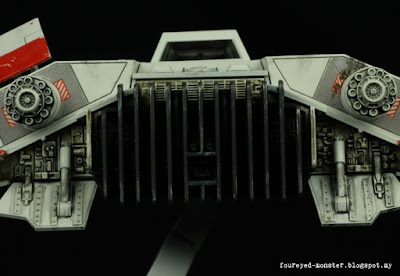
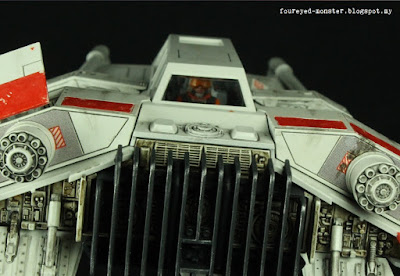
Decals around the main thrust nozzles aren't entirely accurate for a Wedge-piloted snowspeeder

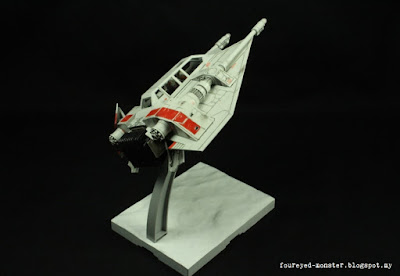
One dislike I do have for Bandai Star Wars scale model kits is the plastic display stand that usually accompanies the 'in mid-flight' models. Its thickness and opacity detracts somewhat from the illusion of a craft in mid-flight. Bandai should have made the display stand using acrylic or clear plastic. No doubt that would've added to the overall kit cost, which is likely why Bandai didn't go down that route. Anyway, discerning collectors could always buy aftermarket display stands for the kit. Meanwhile, the base is functional enough. In this instance, it was painted to simulate snow on Hoth.

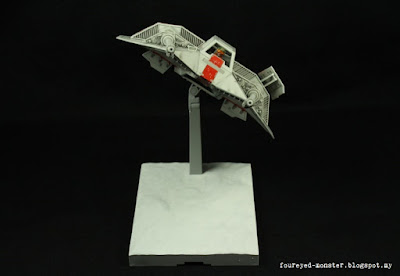
Bandai Star Wars 1/48 Scale Snowspeeder sans clear parts recreating the lasers
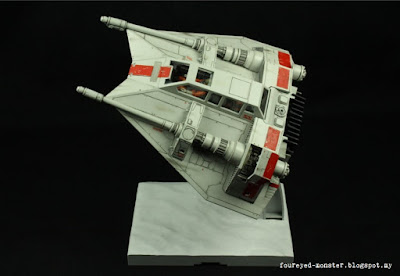
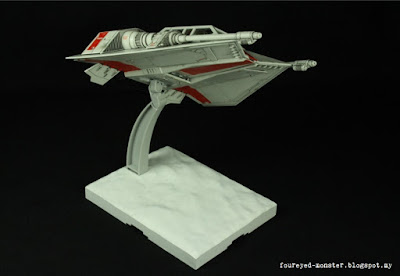
Pure whites of the snow base provide sharp contrast for the off-whites of the snowspeeder hull
Pilot closeups and this overhead view are some of my favourite viewing angles of the snowspeeder  

Weathering was kept relatively light. Those of you who know my work well would know that I usually keep weathering as light as I can in order to preserve the original paint job. Heavy weathering has its uses but only if the diorama or vignette dictates it to be so. For example, if the snowspeeder was a long abandoned craft then heavy weathering would certainly be justified. In this particular display setting, I weathered the snowspeeder to reflect well maintained craft with normal operational wear and tear. Also, no significant snow deposits were added as the snowspeeder was in mid-flight.

No tow cable was deployed in this display version; just a personal preference
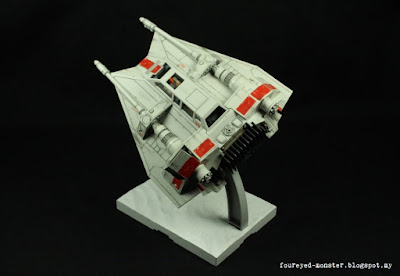
Snowspeeder is executing a leftwards banking turn
'Snow' on base was painted white with some light shading for shadows

The snowspeeder's pose is based on that of an airborne craft banking to the left. As such I decided on an assembled configuration whereby the upper left and bottom two air brake flaps are deployed. It is also partly inspired by the Battle of Hoth scene in which Janson had just deployed the tow cable and Wedge was piloting the snowspeeder in a leftwards banking turn (see second last photo).

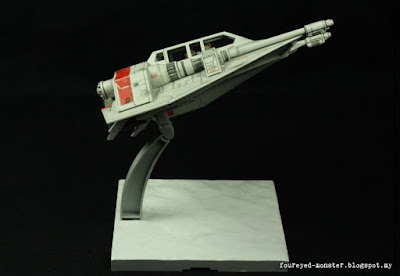
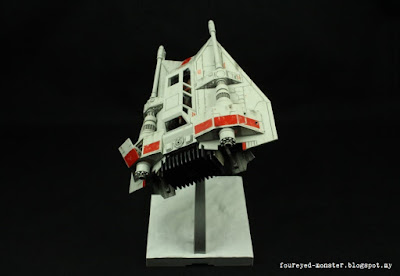
Side view is perhaps the snowspeeder's least flattering of profiles
Thick unwieldy display stand linking the snowspeeder to the base is most visible at this angle
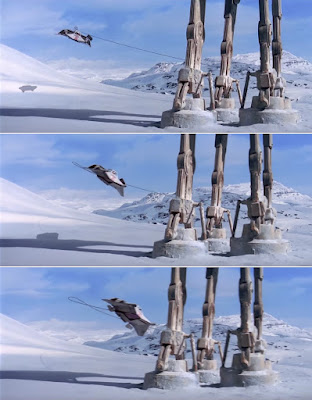
Pose of Wedge's snowspeeder is partly based on this sequence of scenes

Another out-of-the-box issue I have with this kit is the clear plastic recreations of laser shots. They look lame and doesn't in any way enhance the aesthetics of the scale model kit. I just managed one good shot of the 'lasers' in action (see below). Nearly every other time, however, I had failed to get light to reflect off the pair in a way that made them look realistic.

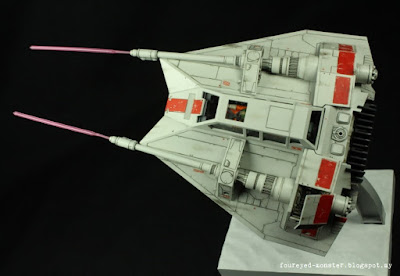
Bandai Star Wars 1/48 Scale Snowspeeder, including clear parts recreating the lasers

Bandai's Star Wars 1/48 scale snowspeeder is an excellent kit which I had great fun building and painting. It's one which I highly recommend. The level of detail Bandai has put into this kit makes it a worthwhile kit for any modeller/painter serious about recreating a piece of Star Wars in your home. I for one can't wait to get started on the next Bandai Star Wars kit. Hint: It's a land-based walker (also my second favourite land vehicle in the franchise) but it also comes with some of Bandai's worse depictions of plastic figurines. More details soon. For now I wish you a good week ahead. 

http://shireworks.blogspot.my/p/custom-painted.html

Friday 27 October 2017

T-55A Medium Tank [WIP - Streaks of Grime, Early Onset of Rust, Diesel Stains and a Realistic Log]

So it begins. Weathering proper for the T-55A medium tank. And it'll be a while before I get the hang of things. Before this, my miniature figurines never needed much if any weathering while the W40K stuff  was more forgiving since they don't conform completely to reality. For this T-55A, I wanted to portray a tank that was only operational for about a year or so in a mostly urban environment. In such a scenario I assumed an early onset of rust on the outer fringes; heavy rust for exposed spare iron tracks; diesel stains on the fuel drums/tanks; and general streaks or smears of dirt and grime.  

T-55A work-in-progress: Early onset of rust and streaks of grime on the turret
Yet more early rust on steel hinges, and old diesel stains on the fuel tank cap

Tools in my weathering arsenal consisted mainly of enamel washes and paints. A notable exception was a Diesel Stain acrylic wash. The enamels were from AK Interactive while the acrylic weathering effect was from Vallejo. In addition, the Mr Hobby Top Coat (Semi-Gloss) was a key product used before and after the weathering process. Before, to protect the paint job underneath. After, to breath life into the weathering washes and paints by increasing contrast and definition.  

Weathering was done using mainly enamel-based products and an acrylic one
Effects of a semi-gloss clear coat on the weathering effects (before, wheels on left row and after, right row)

It was important to keep in perspective the operational age of the tank so as to not get carried away with the application of weathering effects. It's always so much easier to weather the s#*t out of something as opposed to keeping a consistently light touch. In my opinion it's harder to maintain an overall realistic look when weathering is light. Practice (and more practice) is perhaps the best way find that sweet balance in weathering effects. I'll certainly have opportunity for practice with AFVs now forming a more regular part of my miniature/scale model kit project pipeline.

Overhead view of the turret which saw little weathering as the T-55A hasn't logged that many hours yet
Gun mantlet canvas has had more washes applied to it since the last time it was shown
Look closely and you can just about spot very early onset of rust on the turret hooks and storage boxes
Tank hatches have yet to be effected by rust as I presume they would be well oiled in its first year of operation
Headlights were either covered up (colour similar to hull) or exposed (dark grey)
White paint markings still look new because don't forget, the tank is barely operational for over a year

Actually there was one other product I used in the T-55A's weathering process. I had used the Tamiya Weathering Master Set B dry pastel (soot) the recreate how the exhaust vent would look like after being exposed to diesel exhaust fumes. Barely a year into service, I resisted the temptation to make the exhaust vent either warped or discoloured by constant exposure to heat. Soot accumulation was also kept to a minimum seeing that the urban-based tank would've had access to regular cleanups. 

Upper hull after undergoing what I would term as light weathering
Assuming the tank is cleaned occasionally, I didn't go overboard with the buildup of soot on the exhaust vent 
Fuel drums have been weathered to look used but not abused

My reasoning for making this Czechoslovakian T-55A an urban-based tank isn't founded on any particular factual evidence. It's actually based on what could've happened historically after the events of Prague Spring. To keep political liberalisation in check, one assumes a fair amount of tanks would've been based near urban areas like the capital of then Czechoslovakia to forcibly put down any civil unrest. This is of course pure conjecture on my part. It was a choice made to represent this version of the T-55A medium tank in its most realistic form. In no way did I intend to glorify the sad circumstances of a former country which was behind the iron curtain at that time. 

Unditching beam was painted with care to show wood grains and simulate a natural looking wooden log
When painted up, the strings do look like real steel cables; note the beginnings of rust below the tow hooks
Exposed spare iron track is expected rust faster than the painted hull
Right corner of the upper hull's front end with its tow hook cable, spare tracks and headlights

Working on 1/35 scale tanks can be exhausting, fun but exhausting. Even after all this weathering - light as it may be it was still a lot of work - there are two major sections still yet to be addressed. One is the tank commander figurine and the other are the tank tracks. The former is to me the most important piece of the kit while the latter needs to be painted and reconfigured to show a sag (as heavy iron tracks are wont to do and what rubber vinyl parts won't). Soon my very first 1/35 scale model kit will be complete and I will be well and truly hooked on yet another hobby addiction.   

https://www.facebook.com/FourEyedMonster-313145002078520/

Wednesday 25 October 2017

First Look: Brick Works 1/20 Scale Resin Miniatures

Despite being a fan of Brick Works resin miniatures/figurines for the longest time, I never could get hold of any to work on .... until now. What impresses me most about these Japanese produced figure model kits is the level of detail inherent in what is ostensibly a simply designed figurine. These figurines are part of Maschinen Krieger ZbV3000 (Ma.K), a science fiction universe created by Japanese artist Kow Yokoyama in the '80s. I'm not overly familiar with the story elements of this universe as my interest in these resin figure model kits is purely aesthetic in nature.   

Brick Works Maschinen Krieger 1/20 scale resin figurine: Caribou Girl (left) and Santa Girl (right)
Back of packaging showcasing pictures of a fully painted Caribou Girl (left) and Santa Girl (right)
Brick Works Maschinen Krieger 1/20 scale resin figurine: Space Pilot (left) and Refresh Girl (right)
Back of packaging for the 1/20 scale Space Pilot (left) and Refresh Girl (right)

As to be expected from resin cast miniatures/figurines, the details on each are impressive. From the clearly defined strands of hair to the facial features to every fold and texture of clothing, such sculpted details are the stuff of dreams for miniature painters. At least they are for me.    

Brick Works Santa Girl, its separate parts seen here next to a ruler for a rough size estimate
Potential of Santa Girl as realised in paint by Hiroki Hayashi (see background packaging art/photo)
Resin cast miniatures/figurines are renowned for their level of detail and Santa Girl is no exception

All the resin miniatures have been cast in light flesh hues. And to the best of my knowledge, all the figurines here were sculpted by Hiroki Hayashi. He even painted three of the four figurines shown in the packaging art, namely Santa Girl, Caribou Girl and Space Pilot (B) while Refresh Girl was painted by Kow Yokoyama himself. I'm more familiar with the work of Hiroki Hayashi because I'm a huge, huge fan of Hiroki-san's work. And now I can finally paint one of his sculptures.

Brick Works Caribou Girl, its separate parts seen here next to a ruler for a rough size estimate
Potential of Caribou Girl as realised in paint by Hiroki Hayashi (see background packaging art/photo)
Even before any paint is applied, the sweet nature of Caribou Girl's facial features is clearly evident

With this being just my first impressions of the Brick Works resin miniatures, I have yet to remove the resin parts from the packaging for a closer inspection. This I'll do, together with a proper build review, on an individual basis for each and every figurine as I set about to paint them in the future.   

A rough estimate of size for the Mercenary Force Female Space Pilot (B) in Low Gravity/Aerobic Environment
Photograph in the background shows the Space Pilot painted as a Caucasian (left) and as an East Asian (right) 
Realistic folds of the space suit

While all the resin miniatures - except for Refresh Girl (see below) - could be said to have East Asian facial features, it doesn't necessarily define how the figurine should be painted. As evidenced by the excellent paint work on Space Pilot (B), facial features can still be generic enough to be painted realistically as either a Caucasian or East Asian female. Personally, I would prefer painting them in East Asian skin tones to improve my skills in this specific area of the hobby. 

A rough estimate of size for the Brick Works Refresh Girl, Season of Barefoot
Fully painted Refresh Girl as seen on the background packaging art/photo above
Every strand of hair and every curve of the body is captured excellently in this figurine

According to web magazine site [TMP] The Miniatures Page, 1/20 is the theoretical equivalent of 80 mm in terms of scale. I've yet to verify this to be true. With a number of 80 mm Nocturna Models resin miniatures in my collection, verifying the equivalency of both scales should easy enough to do. If they do work out scale-wise, there are so many diorama possibilities arising from combining figurines from two of my favourite resin miniature companies. But as excited as I am to get started on Brick Works miniatures, I plan to finish Bronn first and his completed photos is coming up very soon. Who knows, I just might then get enough momentum to restart my Katana proxy as well.

https://shireworks.blogspot.com/https://www.facebook.com/shire.works

Related Posts Plugin for WordPress, Blogger...