Friday 29 September 2017

Star Wars Snowspeeder [WIP - Power Generator, Cooling Fins and Insulators]

Prior to the first dry fitting using parts already painted, there was one further section of the snowspeeder to complete namely its power generator with cooling fins. But before I began work, something kept tugging at the edge of my mind and wouldn't let go. Then it hit me. Why were the snowspeeder's cooling fins painted in hues usually associated with insulating material? It didn't make sense to use insulators to cool the power generators. Although the Star Wars universe is all make-believe, the functioning of its vehicles should - at the very least - make rudimentary sense.        

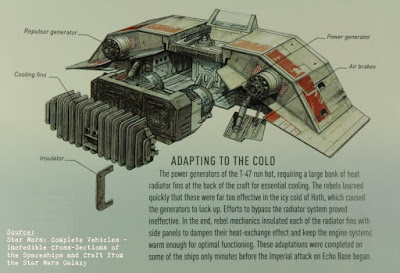
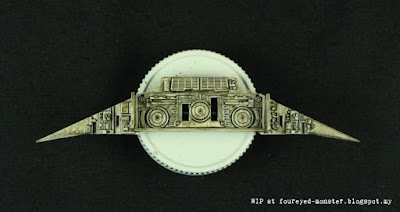
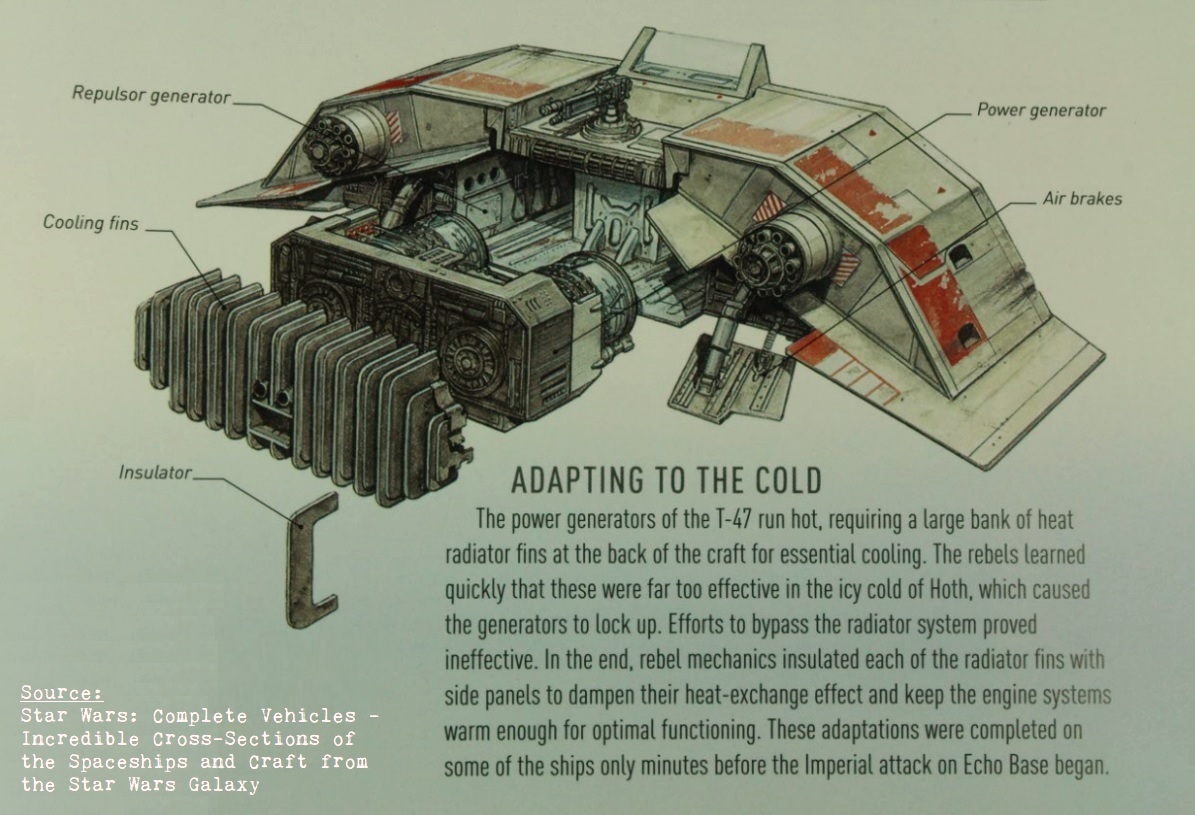
Snowspeeder's technical data was used as a basis for color scheme selection of the cooling fins
Colour scheme for the power generator was also inspired by DK's Star Wars Complete Vehicles
Snowspeeder cooling fins are more or less complete; a mixture of metallic and insulating material colours

One of my biggest faults in this scale model hobby is the tendency to fuss over the smallest details to ensure everything is close to perfect. And this silly little conundrum was threatening to put a spanner in the works. So some research was in order. Luckily for me I found the answer quickly in a DK reference book titled Star Wars: Complete Vehicles. (If you are interested, the answer is in the very first photo.) In a two-for-one deal, the book also conveniently provided me with a colour scheme I liked and eventually used versus the mostly black-to-black grey versions adopted by other modellers. 

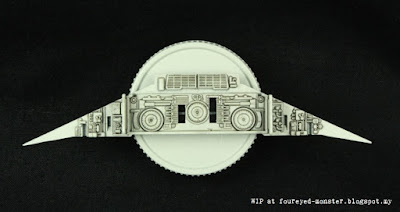
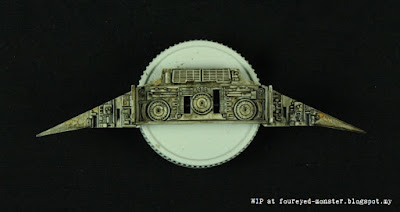
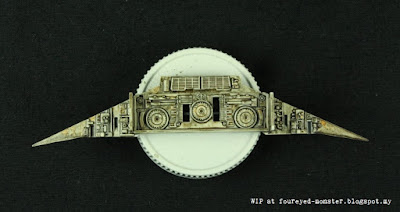
Power generator was given the same treatment as the hull i.e. black grey panel lining over an off-white basecoat

My starting off point was a power generator painted in a similar scheme (sans orange stripes) to the upper and lower hulls. This entailed using the Tamiya AS-20 Insignia White (US Navy) as the primary hue followed by a clear coat of Tamiya TS-13 which in turn served as a protective layer against a black grey Tamiya Panel Line Accent Color mixture (see immediate photo above). Following this, it was the turn of the enamel-based weathering paints/washes of which I used a combination of AK Interactive stuff like AK082 Engine Grime, AK025 Fuel Stains and AK046 Light Rust.  

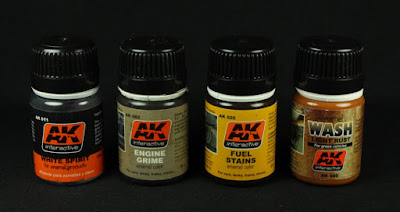
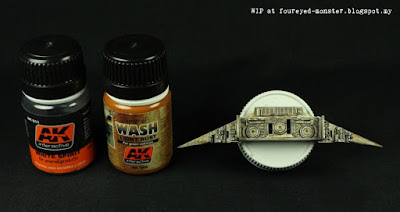
AK Interactive enamel-based weathering washes, paints and solvent
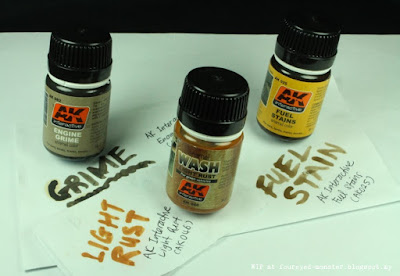
Weathering products are sometimes used not as intended but purely for their colours

A fairly copius amount of Engine Grime was applied to the power generator followed subsequently by a lesser amount of Fuel Stains and lastly a selected placement of Light Rust. I chose these enamel paints/washes primarily for their hues which ranged from a Van Dyke brown-like shade to a Sienna brown hues and ending with a brownish orange highlight. So as you might've guessed by now I didn't use the enamel paints as they were intended for. I don't think the Rebel Alliance engineers - as poorly equipped as they were relative to the Imperial Navy - would've allowed the power generator to be coated with either fuel or rust. Even when taking into account Hoth's harsh winter climate.

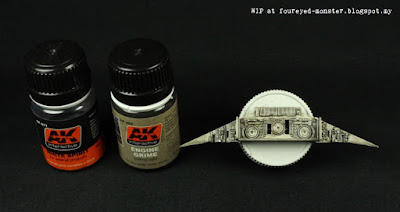
Step 1: Apply AK Interactive Engine Grime
Layer of engine grime was fairly light in view of the subsequent weathering it was to receive

In the wake of time constraints, I hadn't allowed the enamel paints sufficient time to dry before the subsequent layer was applied. This I did even though I knew the earlier layer will likely be washed off by the solvent inherent in the subsequent enamel paint. For some reason I thought I could manage. Well long story short, to compensate for the rush-job I mixed half-tones of the enamel colours and applied it randomly as well as reapplied enamel colours that were cleaned off where appropriate.  

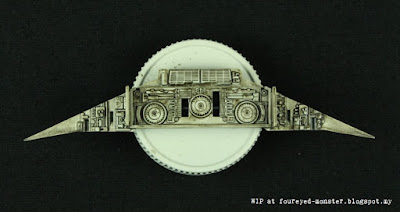
Step 2: Apply AK Interactive Fuel Stains
Sienna-like browns of fuel stain complement the van-dyke browns of the engine grime

Truth be told I'm tempted to darken the entire colour scheme with a dark brown wash. But I'm holding off on the expectation that everything will look darker anyway - by being partially hidden in shadows - once the cooling fins are attached onto the power generator.    

Step 4: Apply AK Interactive Light Rust Wash
Of all three enamel-based paints, the Light Rust Wash was used the least

Speaking of the cooling fins, I first painted it in Tamiya TS-82 Rubber Black which incidentally is an excellent hue to mimic insulating material. Then Tamiya XF-16 Flat Aluminum was dry brushed onto the edges of the fins to depict the insulators wearing off to reveal the fin's metallic nature underneath. 

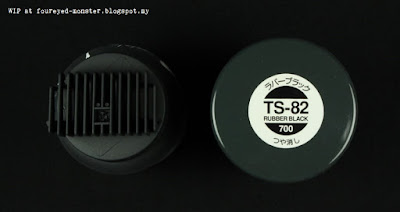
Tamiya TS-82 Rubber Black was just the right hue for an insulating material
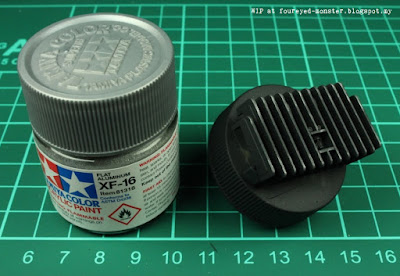
Tamiya XF-16 Flat Aluminum was dry brushed onto the cooling fins as the finishing touch

Meanwhile, I couldn't resist painting yet another unlikely-to-be-seen again part. This time it was the interior of the canopy roof. And because it will be largely hidden from view once assembled, I only did the bare essentials. Enough for a colour scheme (similar to the cockpit interior) to show through even if you caught just a glimpse of it. A case for the KISS principle ... keep-it-simple-stupid.

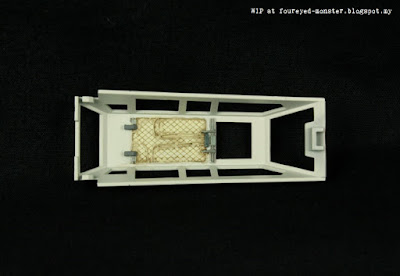
Roof interior of the snowspeeder canopy, which will largely be hidden from view once assembled

Okay, so it's all set now for an 'initial put together' or a dry-fitting of sorts to see how existing painted parts look when assembled. It's also the first chance for me to see if the colour scheme of the pilots combine well with that of the cockpit interior. After that, things should start moving quickly as I already know how I want to paint the snowspeeder's repulsor/laser/power system, air brakes, etc. That's the next step in this Star Wars 1/48 scale build. Until then, thanks for following my progress on this project and have yourself a great weekend ahead.

http://shireworks.blogspot.my/p/custom-painted.html

Tuesday 26 September 2017

Why I finally took the plunge and delved into the world of AFV scale modelling

For the longest time I couldn't bring myself to work on Armoured Fighting Vehicle (AFV) scale model kits seeing that they represented, above all, human suffering in times of war and conflict. Although scale model kits are supposed to be just a fun and harmless hobby, it's a bit naive to think this remains so when the subject matter are real world machines used to wage war. So I decided to take a long hard look at myself to see what has changed for me. At least enough for me to finally embark on this journey - focusing mostly but not entirely on AFVs from World War II (WWII).


Interest in WWII began innocently enough for a five-year old watching an old syndicated US program Combat! being shown on a local TV channel. Childhood play sessions mimicking the show - of which my poor cousin sister would be roped in as a reluctant medic - focused on the "cool factor" of an imaginary machine gun's rat-tat-tat to the naive acting out of a soldier's death throes - to which said cousin would valiantly try yet fail to save us. I supplemented this fascination with whatever second-hand Commando comics I could get hold of; even taking one to my first day in Kindergarten.


This nascent interest then moved on to pestering questions for my grandmother on what it was like to live during the Japanese invasion of Malaya in 1941. Then it became a little bit scarier, a little bit more real. Long story short, the Japanese occupation of Malaya was full of cruel acts of barbarity. Yet I still watched Combat! and read the comics. But now the nightmares set in. One that I remember vividly involved me being a soldier fighting the Japanese army and it ending badly with my head being decapitated. I also remember running from my room screaming hysterically (cue eye roll).    


Then I became aware of the Cold War and would pack all my worldly possessions - a small box of toys - into the back of a tricycle with a notion to cycle away as the A-bomb dropped. (What can I say? As a child I had an overworked imagination. And too much coffee and sugar but that's another story entirely.) Gradually, I turned this interest towards genuinely finding out why would humans start a world war. I devoured documentaries like The World at War and much later World War II in HD Colour interspersed with 'cinematic' pieces such as The Thin Red Line and Letters from Iwo Jima.


With better understanding I became aware of how a minority of people in power could manipulate circumstances that would eventually lead nations to war. A simplistic explanation that is not wholly-accurate. But one which allows us to remove our blinders and step out of biases in which we all too conveniently label an entire country, race or religion as evil. With better understanding also comes my acceptance that AFV scale mode kits can still remain a fun hobby while serving as important reminders of the past. They need not be a homage to all that's bad about war.


Books also form an important source of knowledge about war. At the moment I'm mesmerized by a personal narrative written by a German soldier about his experiences on the Eastern Front in WWII. Titled The Forgotten Soldier, the book is written under the pseudonym Guy Sajer. From what I understand, it's more a book about a soldier caught up in events bigger than himself rather than an anti-war book. If you are interested there is an old archived review of this book by The New York Times which you can access by clicking this link => http://www.nytimes.com/1971/02/07/archives/the-forgotten-soldier-by-guy-sajer-translated-from-the-french-by.html


The million dollar question is how can one present an AFV vignette or diorama that is tasteful yet informative of the horrors of war. I for one don't believe there is a definitive answer to this. On one extreme of the spectrum are fanboys who wax lyrical about the beauty of an inanimate object of destruction while on the other end are naysayers who believe such instruments of war shouldn't be depicted in any way. In the middle - arguably so - are those who believe depictions in scale are important because it serves as a reminder of a period of immense suffering lest we relive it.


So to answer the question why, I've slowly but surely drifted towards the middle path. At its most basic level, my AFV journey will serve nothing more than to showcase my efforts at painting and weathering scale model kits. Going forward I hope to create vignettes/dioramas that'll raise awareness of conflicts both historical and current. To do so, one must first create a realistic paint job and that is what I'm working towards. The words of philosopher George Santayana never rang truer seeing how events are unfolding globally. The parallels are frightening if only we can see it before it's too late.

https://www.facebook.com/FourEyedMonster-313145002078520/

Friday 22 September 2017

Game of Thrones Bronn [WIP - Facial Skin Tone & Lips Revisited]

A while back ago I had stopped working on Bronn - a Game of Thrones character that I'm portraying using a Nocturna Models resin figurine - because I had reached a point whereby each attempt at correcting a mistake was resulting in yet more mistakes. I needed to take a step back. Time off, if you will, to work on other projects before coming back to this avaricious Westerosi sellsword. 

Bronn the Sellsword with his facial skin tones reworked for smoother transitions
Corrective work was also carried out on his upper and lower lips

Unfortunately, there was a price to pay for this long hiatus. Because I had painted Bronn during a period in-real-life when many things were going wrong, I was distracted to the point that I forgot to jot down his skin tone paint recipe. Previously I contemplated up to three skin tone colour schemes, one of which I had actually posted online. But for the life of me I couldn't remember which colour scheme I eventually used. So I tried the best I could to match the existing skin tones, the results of which you see here in this post. All things considered, I think his face turned out pretty okay.   

Bronn's blade was mildly weathered with Vallejo Engine Grime and Citadel Agrax Earthshade
Greenish hues are inherent in the paints used for his skin tone

There were two key issues I had to resolve. Firstly, the shadowed areas of his forehead creases were too wide and transitions were too abrupt. Apart from the forehead, the other issue involved Bronn's upper lip which was indistinguishable from his mustache. Both mistakes only came to my attention when I took macro photographs of Bronn's face (before pictures can be seen here) as they were not really visible to the naked eye. But the mistakes still rankled so I went back in with a Kolinksy Sable brush to touch up his forehead creases as well as paint his upper lip back on to the face.

I have seen dwarfs and dragons but it's the lioness that scares me

So Bronn is about done. All that's left to do is give him a once over and touch up any spots I may have missed. Hopefully it won't be anything major so I can post completed photos soon. Reworking Bronn's skin tone has made me realize how much I miss painting miniatures. As such I'll try to work in some figurine painting sessions in between time spent on my Star Wars and AFV scale model kits. Looks like I've some juggling to do with this triad of hobby projects. At the very least, it should challenge me to improve on a wider spectrum of skills. More importantly though, it'll be three times the fun. Until next time, thanks for reading and have yourself a great weekend.

https://shireworks.blogspot.com/https://www.facebook.com/shire.works

Monday 18 September 2017

T-55A Medium Tank [WIP - Assembly Part 3 of 3]

Having had it easy all this while with the assembly process of miniature figurines, I used to bitch and moan about how the Knight Models metal figurines can sometimes be a real challenge to assemble. But looking back now, it was precious experience gained which made for a much smoother transition into the world of armoured fighting vehicles (AFVs). So yet another step in my journey through the miniature/scale model hobby has been taken with the assembly of the Tamiya T-55A medium tank. 

Tamiya T-55A Medium Tank: Largely assembled and awaiting a primer coat
Tracks, tow cables, fuel drums, unditching log, snorkel and crewman will be painted separately before final assembly

Of all the different sections of the tank, its turret was the hardest of all to put together. There were a lot of small and fiddly parts to work with. In particular, the turret hooks and searchlight assembly were problematic, and both for different reasons. While the hooks were easy to glue onto the turret, their extremely tiny size meant that when I accidentally 'pinged' a few right across the room I had a hell of a time looking for them. Meanwhile, it was fairly difficult to keep the searchlight's many small parts in the correct position relative to one another and glue them together. Difficult but doable.    

Level of detail was highest on the T-55A turret ...
... hence it was the most challenging section to put together

What struck me most during assembly of the T-55A were the need for new tools which weren't required even on a particularly difficult miniature figurine build. Two such tools are hobby clamps and the pin vise/drill bits. While I had used the latter before to drill muzzle holes on a Space Marine's boltgun, AFV model kits need a wider range of hole sizes to be drilled. With the T-55A being a simpler model, only two sizes were needed i.e. 1.0 mm and 1.5 mm. But more complex kits such as Meng Model's Russian ZSU-23-4 Shilka require hole sizes ranging from 0.6 mm to 2.4 mm.  

Additional must-have tools for the assembly process: pin-vise, micro-drills and hobby clamp
Steps 12 and 13 of the T-55A assembly process: behold the tiny hooks
A miss-step saw thin glue seep into the hobby-clamp and slightly damage the turret surface

And as for the hobby clamps, they are usually required to hold two large parts together while the glue takes hold. A slight mistake on my part saw some of the extra thin glue flow into the clamps via capillary action. Luckily for me, the damage was not too extensive. Moreover I do not expect the damage to be very visible if at all once the primer, basecoat and weathering has been applied.

Tiny hooks in comparison to a paperclip and a five sen coin ... See? I wasn't exaggerating how small they are
Hooks were positioned according to the Czechoslovakian Army tank version
Basics of the turret completed i.e. up until Step 13 of the instructions

Apart from the hooks and searchlight, the rest of the turret came together painlessly. The only other issue of note was "storage box on turret (b)" whereby one of the four connecting points didn't touch the turret surface leaving a slight but obvious gap. To resolve this, I cut out a tiny piece from the excess sprue, wedged it between the gap and then applied extra thin glue onto it to melt the pieces together. Unfortunately I forgot to take photos of this issue so you'll have to take my word for it. 

Assembly of the first few turret pieces that are specific to the Czechoslovakian Army T-55A
Instructions for yet more turret parts that are specific to the Czechoslovakian Army version
Final two steps of the T-55A build comprising the tank commander and standard turret pieces
Czechoslovakian Army T-55A turret build completed
Tank commander sits atop a superbly detailed turret

With the help of a bucket-load of patience the turret eventually came together piece by piece, little by little. Details are impressive for this tank from the cold war period and I can't wait to get started priming and painting the T-55A. Although a lot of hobby hours have been put into the assembly process, a lot more hours of painting and weathering lie ahead before the tank can be brought to life.

Except for the commander, unditching log, tracks and tow cables, everything else will be basecoated in olive drab

At least now I have an inkling of the work (i.e. hobby-hours) involved in putting together a 1/35 scale AFV. Moreover working on a relatively straightforward build has allowed me the opportunity to 'dip my toes' into AFV model kits of this scale. Going forward, there will arguably be much tougher or at least more complex builds e.g. Meng and Trumpeter kits. But for the moment, it's valuable experience gained and most importantly it has been fun. That's why we have this hobby after all.

https://shireworks.blogspot.com/https://www.facebook.com/shire.works

Related Posts Plugin for WordPress, Blogger...