Wednesday 30 August 2017

Star Wars Snowspeeder [WIP - Rebel Alliance Pilots Wedge Antilles and Wes Janson]

Painting miniature figurines remains my first and strongest love in this hobby. I still get that same rush I felt when completing the paint job of my first miniature all those years ago. After weeks of vehicle painting and weathering - which I enjoy, don't get me wrong - it was a relief of sorts to get back to work on the miniaturised human form once again. And in a way, both Wedge Antilles and Wes Janson were the perfect miniatures to restart my long neglected figure painting work. That was because I didn't have to paint their eyes (arguably the hardest part to get right) which were covered by their helmet visors. Ironically though, the helmets turned out to be pretty difficult in and of itself. 

Rebel Alliance snowspeeder pilots in the Battle of Hoth: Wedge Antilles (left) and Wes Janson (right)

Getting any details on the helmets was extremely tough, more so when I needed to differentiate markings to the extent you could tell who was wearing them. Wedge Antilles and Wes Janson each wore helmets with distinctive markings that I had to recreate at 1/48 scale.

Snowspeeder pilots at 1/48 scale show in comparison to a five sen coin and a paperclip

Of the two, Wedge wore a helmet with relatively simpler markings. Simpler to paint freehand that is. Two huge green rectangles on either side of Wedge's helmet made the painting process considerably easier. It also helped that most other symbols on his helmet comprised simple squiggles and straight lines. Perhaps the most difficult part was the circles around the sides of the helmet. Painting a circle is difficult enough to do freehand so as you can well imagine doing it at this scale was ... difficult.

Wedge Antilles shown here at extreme close up to highlight his helmet and flight suit 
Wedge's flight suit panel was blue in A New Hope, but it became red and green in The Empire Strikes Back
Wedge in the Battle of Hoth as seen in The Empire Strikes Back, plus closeups of his helmet

In Janson's case, it was much more difficult to source for reference materials because as far as I can recall there were no full body shots of him in The Empire Strikes Back movie. From what I could find online, his flight suit was similar to Wedge's own attire, at least based on how Janson toy action figures were predominantly painted. In addition Janson's helmet was slightly more complex with a red-and-white checkered design in place of Wedge's simpler green rectangles.

Wes Janson, snowspeeder tail gunner and a good shot apparently
Less reference material was available for Janson, apart from his helmet
Wes Janson in the Battle of Hoth, and closeups of his helmet

As for the rest of both pilots flight suits, care was taken to achieve contrast as best I could at such a small scale. But in order to keep the pilots' colour scheme from becoming too cartoonish, I refrained from applying too much contrast. I used a Sideshow Collectibles Luke Skywalker Snowspeeder Pilot as reference when painting up the flight suits for both Wedge Antilles and Wes Janson.

Heavy is the burden we carry, for the Empire is about to strike back (... good haiku this is not)

Like a balm on a wound, the process of painting miniature figurines always provides me with a sense of soothing calm to the mind. Moreover, figurines also provide a sense of scale to a scale model kit as well as heighten the realism of the overall piece. And it's that wish to capture a piece of reality in miniature form that best explains the rush I feel, most avidly, when painting figurines. Here's hoping you feel that same rush in your own projects. And to my fellow Malaysians ... Happy Merdeka Day!

https://shireworks.blogspot.com/https://www.facebook.com/shire.works

http://shireworks.blogspot.my/p/custom-painted.html

Saturday 26 August 2017

T-55A Medium Tank [WIP - Assembly Part 1 of 3]

A key difference between miniature figures and scale model armoured fighting vehicles (AFVs) is that the latter's build (or assembly) forms a significant part of the overall process. If you were to include photo-etched and/or scratch build parts as well as take into consideration that some kits contain 1000+ parts, the build could easily take up more than half (or even two-thirds) of the total hours spent on the scale model kit. My maiden attempt at modelling AFVs, however, will be a straight out-of-the-box (OOB) build although I was sorely tempted to scratch build some fuel lines.  

Tamiya T-55A Medium Tank build, work-in-progress (Part 1 of 3)
Drive sprocket as well as idler and road wheels, shown here attached to the lower hull sans tracks

Almost all AFV builds inevitably start with the road/idler wheels and drive sprockets, and the Tamiya T-55A medium tank is no different. These were easy enough to put together but a real pain to clean up, specifically the mould lines on the road wheels. Extra care was also taken not to get glue on the poly-caps. These are tube-like polyethylene parts that allow the wheels to attach to the torsion bars and retain some rotary movement in the wheel system (see immediate photo below).

First steps of the build were spent on the tank's road/idler wheels and drive sprocket

Steps 2 and 3 saw the lower hull take form with its suspension system, fuel drum racks and other miscellaneous details glued on. Due to the nature of some of the tank's parts, namely being small and fiddly, the best glue to use would be one that works via capillary action. My favourite glue for use on AFVs is Mr Hobby Mr Cement S (check out my review here) although the Tamiya Extra Thin Cement is a good alternative. There weren't many small and fiddly (smidlly?) parts on the lower hull but they are in abundance especially on the turret but that's for a worry for later.     

Tamiya T-55A instructions: steps two through five
T-55A medium tank suspension system sans the wheels
Fuel drum racks (far right) attach via the inside of the lower hull
Closeup of the front-end of the T-55A's lower hull with what looks like bolted-on steel bars
Fuel drum racks; snorkel holders (two triangular protrusions below the racks); and tow hooks make up most of the rear 

Then it was off to steps 4 and 5 in which the initial parts of the upper hull were assembled. These included some triangular brackets; semi-circular parts to round out the turret area; rear vents; moulded hatches and inner body of the exhaust. Nothing to shout about yet but enough to set the foundation of whats to come. Rounding off the first five steps was the gluing together of the upper and lower hulls which were made a pain-free task thanks to the above-mentioned capillary glue.  

Upper hull of the T-55A with the initial parts glued on

After these early steps I get why the whole AFV process can be addictive. Just assembling the parts together already provides a satisfying sense of accomplishment. This feeling is more tangible than any felt when putting together Bandai's snap-fit model kits. Because let's face it, snap-fitting parts together provides next to no challenge which is why I rarely do work-in-progress build reports for the Bandai Star Wars model kits unless they are pertinent to the overall process.

Upper hull and lower hull combined, with wheels and drive sprockets attached but sans tracks
A view of the T-55A lower hull again but this time from the opposite angle from before

Speaking of which, alternating between Bandai's T-47 Snowspeeder and Tamiya's T-55A tank is turning out to be a good choice for me because it's keeping things fresh on a weekly basis. And approaching any project with a persistently fresh outlook is always a good thing. I'll be completing the snowspeeder pilots (i.e. Wedge Antilles and Wes Janson) soon and I can't wait to share the results of that paint job on the next post. Until then, be happy and well.

https://shireworks.blogspot.com/https://www.facebook.com/shire.works

Wednesday 23 August 2017

Star Wars Snowspeeder [WIP - Cockpit Interior]

From inside to out is how the Snowspeeder is most likely going to be painted. That means starting from the inside the cockpit interior to the pilots, then the canopy together with the main upper/lower hulls, followed by the back engines, laser system, repulsors and ending with a general weathering process. Some decals will be used but it'll generally be a spray-can and hand-brush painting effort.

Bandai Star Wars 1/48 scale Snowspeeder - work-in-progress on the cockpit interior

Inspiration for the snowspeeder cockpit interior's colour scheme was twofold. Firstly, a DK reference book titled Star Wars: Complete Vehicles.  That's when the possibility of an interior with warmer hues first occurred to me. Secondly, The Empire Strikes Back showed the snowspeeder interior - what can be seen anyway as its lower sections weren't visible in the film frames - in a cooler colour scheme. That made sense as a form of counterbalance to the pilots warmer colours i.e. skin tones and orange flight suits. In the end, I combined both colour concepts for my own version of the interior.

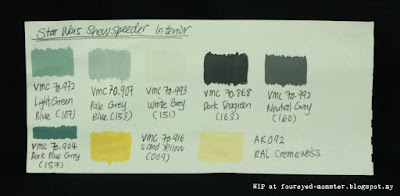
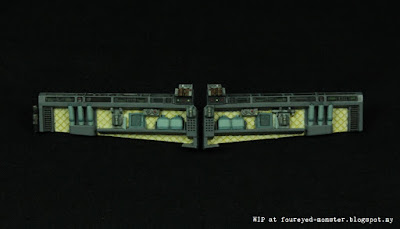
Snowspeeder cockpit interior's main colour scheme - a mixture of cool and warm hues
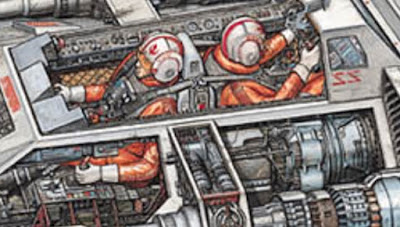
Snowspeeder cross-section and interior, source: Star Wars: Complete Vehicles

One key thing I did was to lighten the cockpit interior's warm hues on the padding-like texture from a dark yellow as seen in the DK reference material to a lighter hue of creamy white (cremeweiß in German or spelt cremeweiss in English). Then to add a some 'pop' into a generally dull grey/metallic look of the cockpit interior, I used neutral greys in conjunction with greenish and bluish greys. These came in the form of Vallejo Model Color acrylic paints (see second photo above).

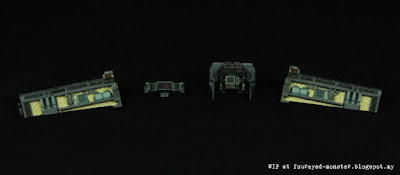
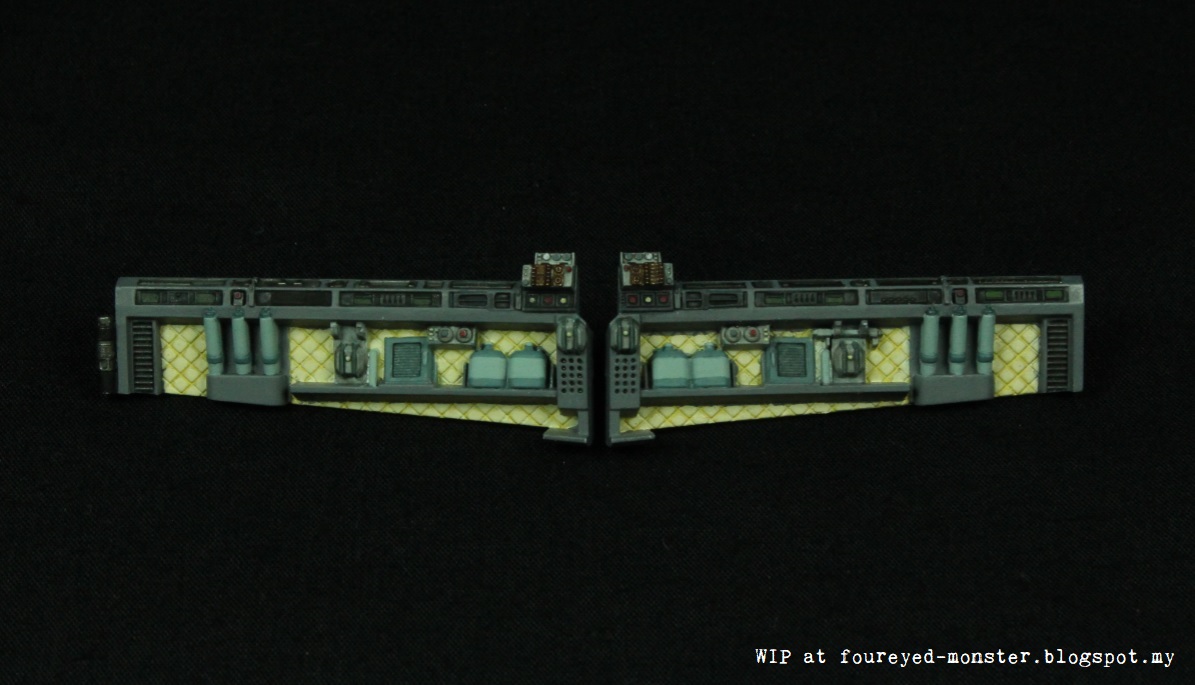
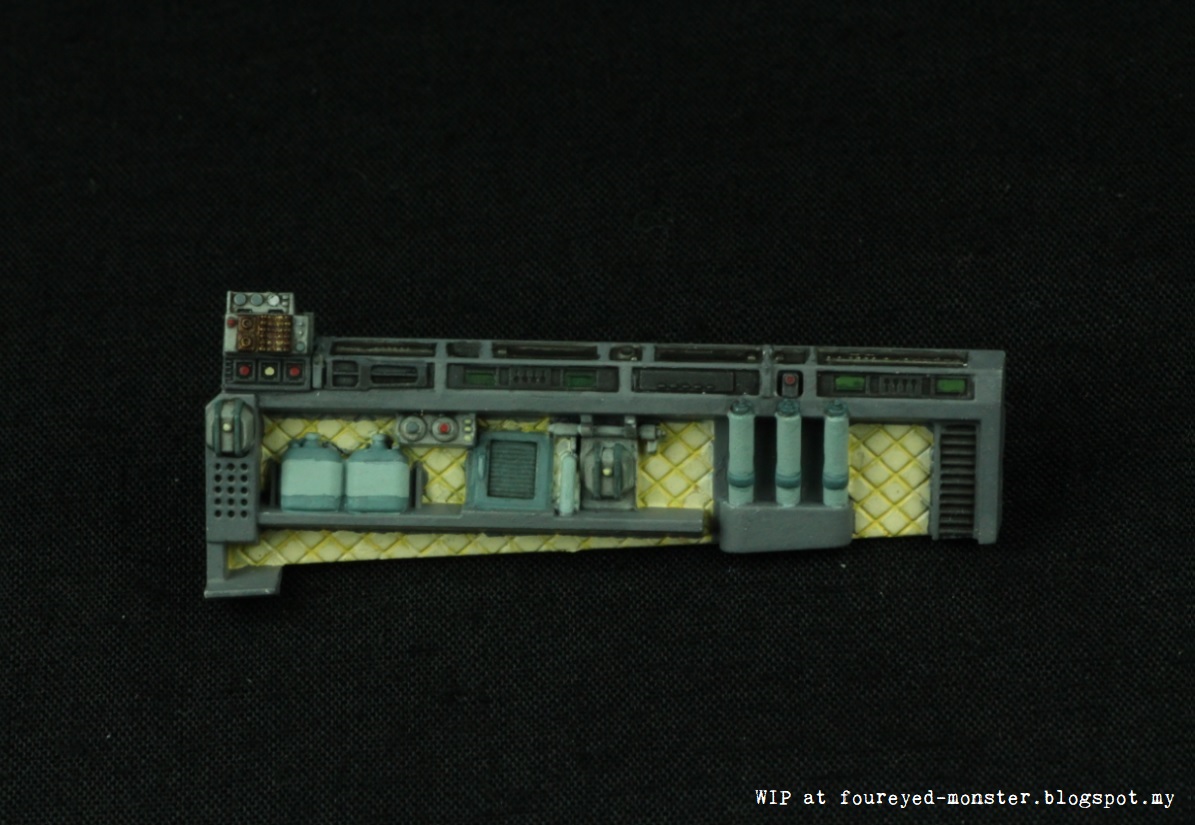
Snowspeeder's cockpit interior stretched out in a line sans the seats

To create extra detail in the snowspeeder cockpit interior, I did the best I could at this scale to paint some screen displays on both the pilot and tail gunner's instrumentation panels. This translated into a radar ping on the gunner's left most display and lines of computer text on the pilot's main screen.

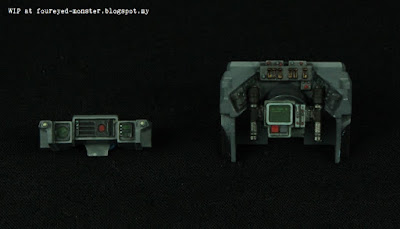
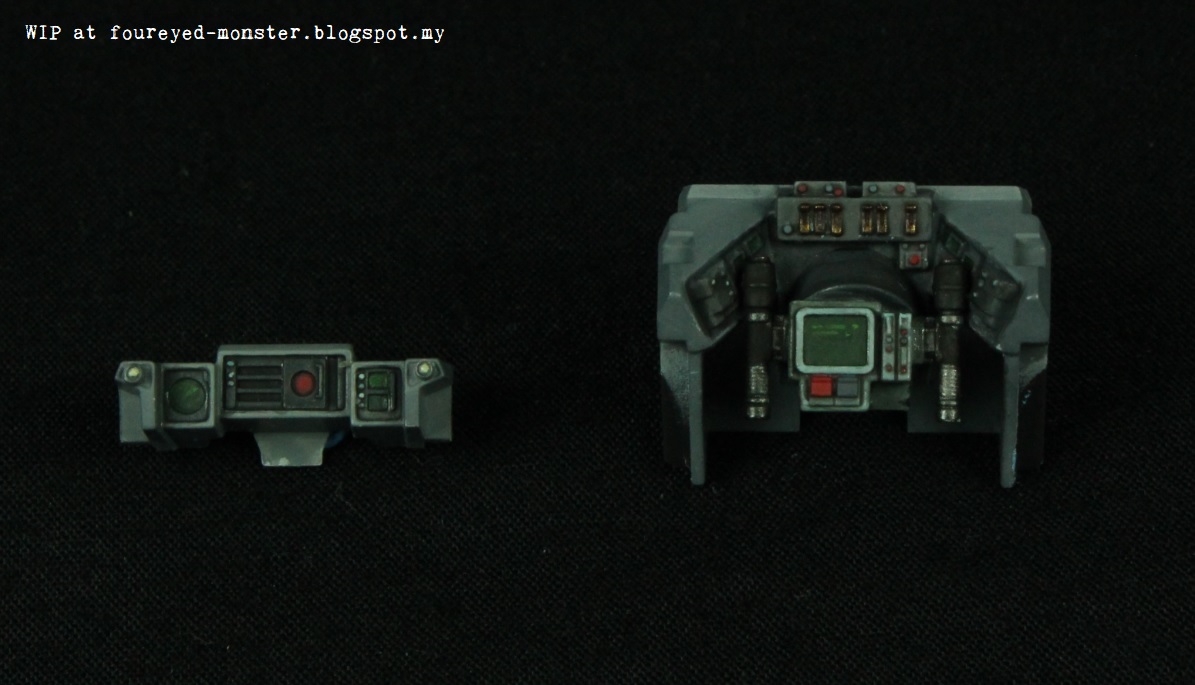
Instrumentation panels for the snowspeeder's gunner (left) and pilot (right)
Cremeweiss hue on interior's padding was inspired by a DK book titled Star Wars: Complete Vehicles  

That I'm okay with the fact that results aren't anywhere near how I envisioned them is a testament to my newfound hobby-related trait of letting go at the right time. So instead of unnecessarily spending  precious time to enhance a paint job, I am slowly learning to step back and stop when such an effort is pointless (beyond fulfilling one's obsessive-compulsive tendencies). Once the pilots are glued onto their seats, most of the cockpit interior will be hidden from view. Focus will also shift towards the more brightly coloured pilots. Hence more paint-hours will, alternatively, be spent on the pilots.    

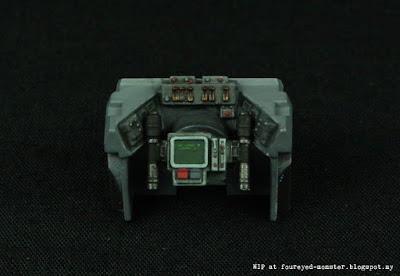
Pilot instrumentation panel - text lines on the display screen up the realism factor
Tail gunner instrumentation panel - main details added include the radar ping display and a big red button
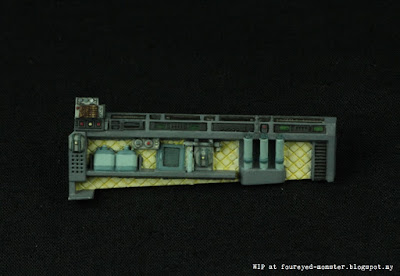
Pale greyish blue/green hues were balanced by the cremeweiss (creamy white) hue
Quick trivia - cremeweiss hue on interior padding could also be found in interiors of German WW2 tanks
Seat colours were based on what I could make out in the Empire Strikes Back Hoth battle scenes

Now if this project was about a grounded snowspeeder under repairs in a rebel base then it would've been a different story entirely. In such a scenario, focus would be on the cockpit interior. And with it the need for more paint hours to be invested in the said area. But this isn't my intention for this build so what you see here is about as far as I'm willing to go for the cockpit interior. 

Snowspeeder cockpit interior as compared to a paperclip and a five sen coin for scale

My hopes are on the snowspeeder pilots being the 'wow' factor of the cockpit area. To me, that means painting the pilots in such a way that they are discernible as Wedge Antilles and Wes Janson. At this scale, I'm under no illusions as to how tough this is going to be. More so when I don't have any helmet decals to assist me in creating Wedge and Wes lookalikes. But if my enthusiasm for painting miniature figures again is any indication (especially after weeks of pure vehicle work) then I might just pull it off. Leia's last words to the snowspeeder pilots were good luck ... I'll need that for sure.


https://www.facebook.com/FourEyedMonster-313145002078520/

Saturday 19 August 2017

Tamiya 35257 - Russian Medium Tank T-55A [Unboxing and Pre-Assembly Review]

I guess it was just a matter of time before I caught the AFV (armoured fighting vehicle) bug. And the T-55A medium tank is as good a starting point as any, with it being a part of a series of tanks (the T-54/55) that is the most-produced in military history. They are said to be in use by up to over 50 armies worldwide which gives the tank a lot of potential in terms of colour scheme variations. However, I’ll be keeping it simple for this build by putting together a Czechoslovakian Army T-55A medium tank which has a monotone colour sans any complicated camouflage schemes.

Tamiya 35257 - Russian Medium Tank T-55A
Tamiya Russian Medium Tank T-55A side box art

Tamiya's accompanying manual is multi-lingual with fairly detailed instructions. One thing is for sure,  this build will be far more complex than Bandai's beginner friendly snap-fit parts found in their Star Wars line. That being said, Tamiya scale model kits are generally well known for their well-engineered parts that not only have excellent fit but are also easy to put together.

A brief history of the ubiquitous T-55A medium tank
Instructions are multi-lingual and easy to follow

Tamiya's design philosophy is seemingly to have a lower part count without sacrificing details. For example, this model kit has nearly 300 parts versus the 1000+ parts found in some other brands.

Sprue A (x2): Wheels, hooks fuel drums, etc.
Sprue B:Main turret and accessories
Closeup of the turret showing off its cast metal surface texture

Details on the T-55A parts are reasonably good especially on the turret which has a subtle surface texture resembling cast iron as well as weld lines/seams. Another notable textured part is the wooden grains of the T-55A's rear log beam. While the other parts do not have much texture, they do still possess fine details moulded on them. Even the tank commander figurine included in the model kit has impressive details ranging from the folds on his uniform to discernible facial features.

Sprue C: Ammo boxes, gun barrel, rear log beam, machine gun, snorkel, etc.
Sprue D: Fender fuel tanks, tank commander, rear inner grilles, etc.
Upper and lower hull - main sections

While the T-55A's vinyl tracks look fairly detailed, they could provide some challenge when trying to make them sag on the wheels for a more realistic look. Included in this kit are also a fine mesh and a string to simulate metal grilles and tow cables respectively. Decal options are minimal but enough for my purpose to build a Czechoslovakian Army T-55A medium tank, designated turret number 421.

Vinyl tracks are detailed enough but may prove to be a challenge when going for a realistic sag-on-wheels look
Decals, mesh to simulate grille texture, strings as a substitute for tow cables and polycaps for the wheels

As promised, I'm alternating between two main projects for the coming weeks on a more consistent basis. So it'll be a the Star Wars Snowspeeder on one post and the T-55A medium tank on the next for the foreseeable future until either one or the other is finished. The only thing that could break up this double act is perhaps the final completed photos of Bronn the sellsword but that's only if I can sort out the skin contrast on his forehead. As such I certainly won't be abandoning my miniature figurines as I work on the AFVs (which have mini figures of their own). So let's get started already!

https://shireworks.blogspot.com/https://www.facebook.com/shire.works

Related Posts Plugin for WordPress, Blogger...