Monday 27 June 2016

Star Wars Darth Vader [WIP - Upper Torso]

Painting Darth Vader isn't as straightforward nor rewarding as one would assume. After all he's just black so how hard could it be, most (non-hobbyists) would argue. Worse still, the end result isn't as satisfying nor impressive compared with a miniature/model kit that has a more colorful scheme. Painting Vader, in other words, might not be worth the effort. But then I got to thinking. This is the Dark Lord of the Sith himself. I had to paint Darth Vader. I had to. Resist the dark side, I could not.    

Bandai 1/12 scale Darth Vader, work-in-progress with head and upper torso completed

For the upper torso, I focused on Vader's chest armour with its alternating metallic gun metal and gloss black stripes, the chest panel controls, the inner/outer cloak, and his undergarments i.e. clothing with a horizontal crosshatch design. The chest armour was given a primer/basecoat of Citadel's Abaddon Black with Boltgun Metal used for the metallic stripes. Then the black stripes were glossed back up using Vallejo Gloss Varnish. Meanwhile, Vader's chest panel was painted using Citadel Skull White, Abaddon Black, Fortress Grey, Ultramarine Blue, Red Gore, Blood Red, Chainmail, Boltgun Metal, Warplock Bronze, Dwarf Bronze and Vallejo Gloss Varnish. So much paint for so little effect!  

Parts of the upper torso, after painting using Citadel and Vallejo acrylics
Originally, the breastplate had a shiny sheen on which black decals were supposed to be applied (top). Instead, I decided to basecoat it black, add metallic silver and then apply a gloss coat on the black stripes (bottom)
Details on the chest panel were also painted; no decals were used

For the upper torso's non-shiny bits namely Vader's undergarments and cloak, I used a warm matte black (pure Abbadon Black) and an even warmer black (Abbadon Black plus Kommando Khaki) respectively. Bandai's colour guide had recommended a cool black i.e. black plus a pinch of blue for the undergarments. However based on my own research on the actual costume used on the set of Return of the Jedi, I found the blacks to be 'neutral warm' - somewhat less warm than the cloak.  

Barely half complete, Bandai's Vader would still look good as a bust
My empire for an arm ... or two
A nice silhouette for s stamp, don't you think so?
A clear view contrasting the glossy black of Vader's helmet and the warm matte blacks of his cloak

Being used to some excellent detailed sculpts at way smaller scales I suppose I should be expecting great details from a 1/12 scale model kit. Nonetheless, I was still pleasantly surprised by the effort and attention Bandai's designers had put into making this one of the most, if not the most impressive Darth Vader figurine at this price range (roughly ¥2,592). Proportion-wise Bandai has nailed it! 

Back view of Vader's work-in-progress upper torso
Gloss and matte black look like two completely different colours
Proportions seen on this side view highlight just how right Bandai got this one

From here on out, there will be four main considerations when painting Darth Vader: his belt; clothing (rest of the cloak, codpiece plus undergarments); appendages; and weapon (lightsaber handles). Seeing that Vader is in 1/12 scale which is rather large; the rest of the black to be painted can be done as a single flat coat because the clothing pieces are large enough to catch light and provide sufficient contrast without having to paint in the highlights. So things should speed up considerably with only the belt and lightsaber handle providing any real challenge. As such I should be able to put up another progress post before the week is out. Until then, it's bye for now.

Saturday 18 June 2016

Star Wars Darth Vader [WIP - Head, helmet & mask]

It feels good to hold a brush in my hand and paint flesh tones again. Perhaps it's a bit unorthodox I'm seeking to sate my desire to paint with a brush (as opposed to spray painting straight from a can) in a figure that is almost all black. But this model kit actually has a lot of little details that need painting. There is also all that black to paint. That's much easier than it sounds because painting black involves colours other than black ... and I'm not talking about grey. But that's a worry for the future. For now, let's take a look at the painting of Darth Vader's head, helmet and breath mask. 

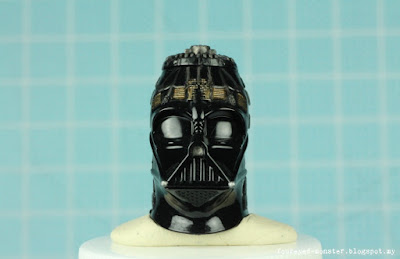
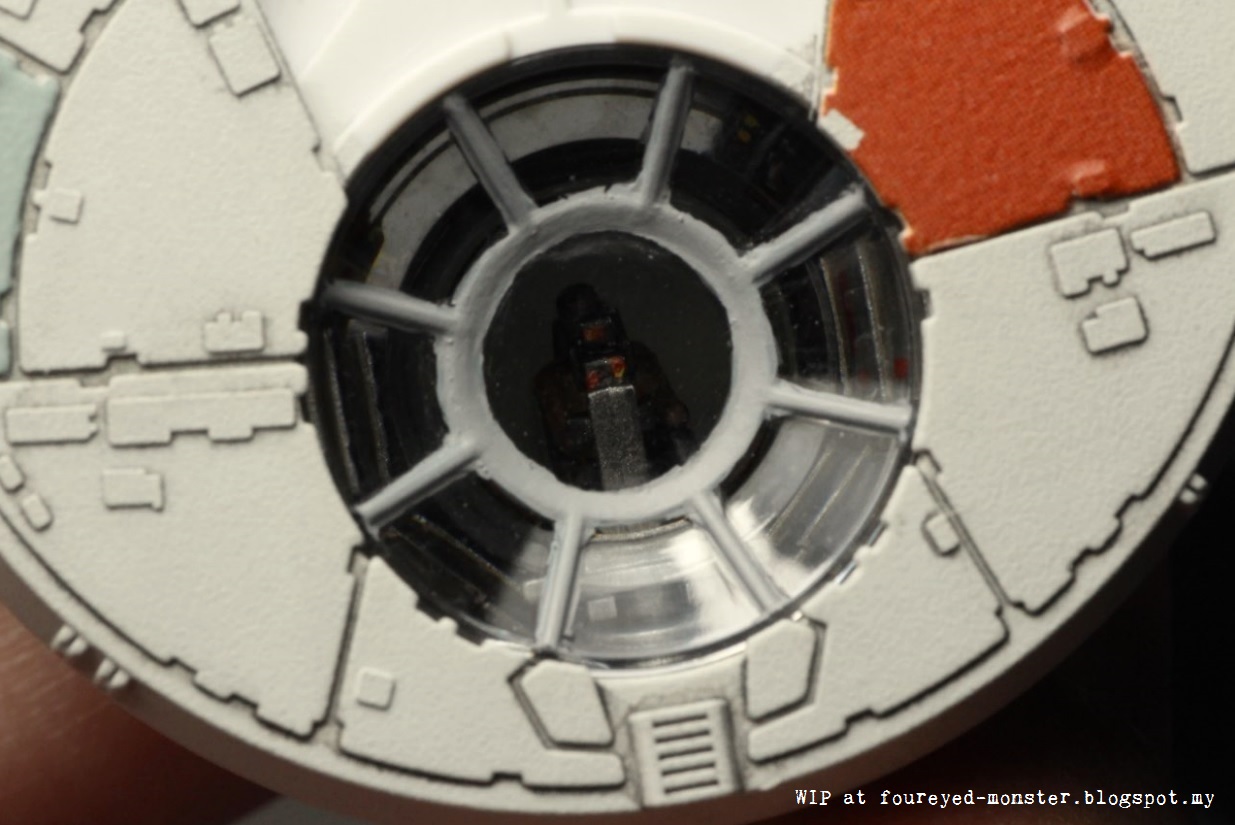
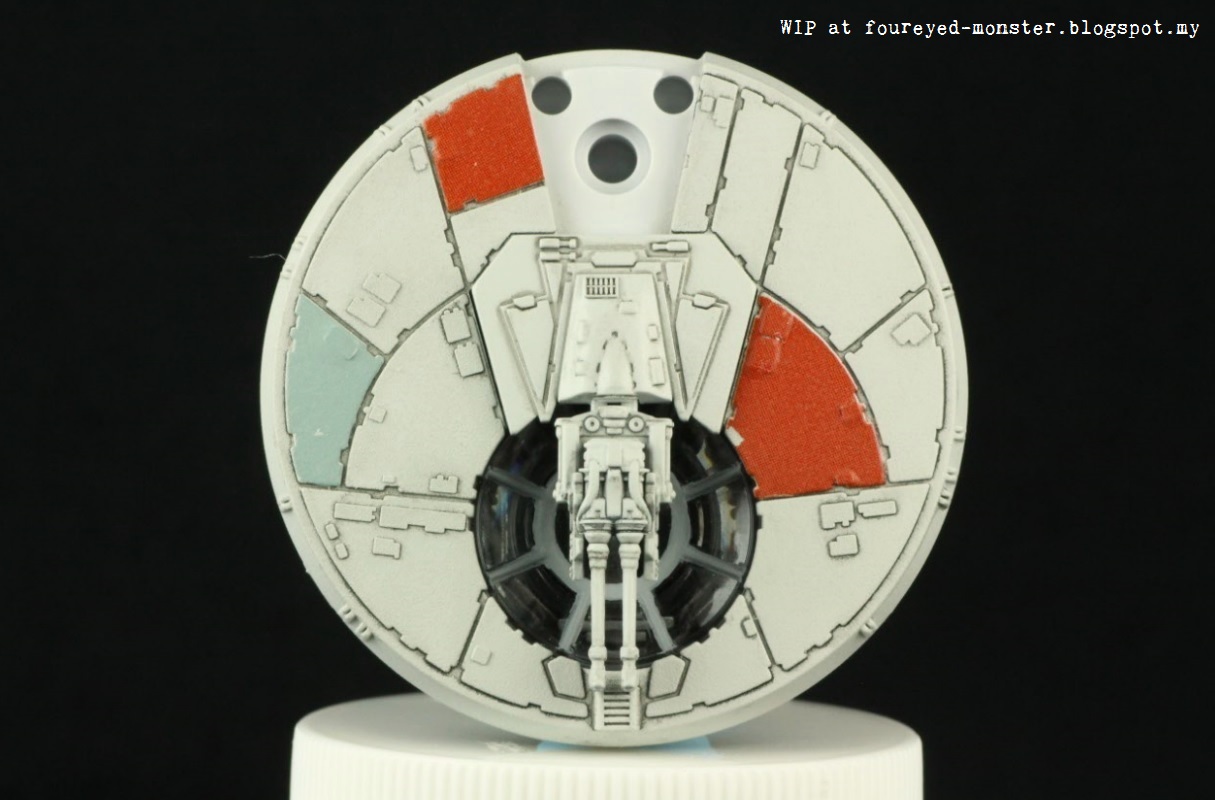
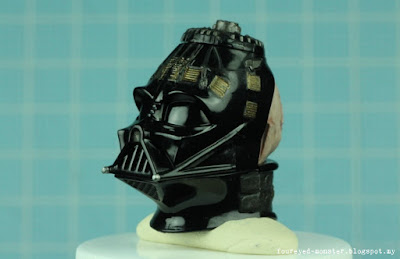
Darth Vader's helmeted head at 1/12 scale
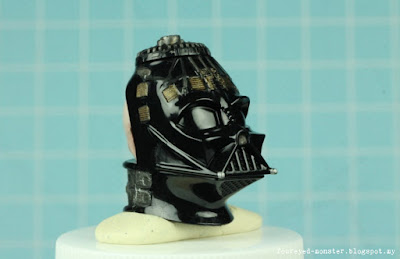
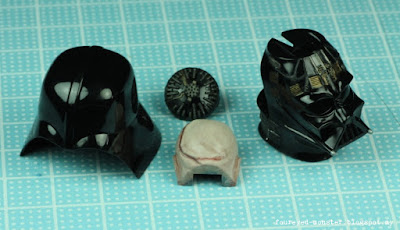
Clockwise from left: Darth Vader's locking helmet, magnetic clamps, breath mask, back of head

My one and only reference when painting Vader's head/helmet/mask was a book titled Star Wars Costumes: The Original Trilogy. I love this book both as a Star Wars fan and as a modeller who needs good quality photo references. For the most part, I use this book as well as another one called Sculpting a Galaxy when working on Star Wars-related projects involving the original movie trilogy.

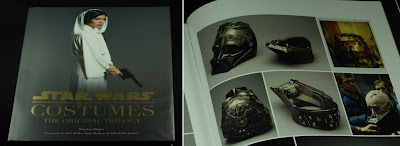
Star Wars Costumes is an excellent reference book for hobbyists

Things got off to a relatively bad start when I got impatient and tried painting a bright gold metallic colour onto the breath mask's body heat regulators [square vent-like thingamajigs on the forehead] without first laying on a darker metallic base colour. As I don't practice painting metallic colours as often as I should, my forgetfulness played a part too. Other metallic colours on the breath mask were more straight forward: a simple dash of gun metal on all three points of Vader's triangular respiratory intake, and a mixture of gun metal/bronze for the top of the head i.e. the helmet's magnetic clamps. 

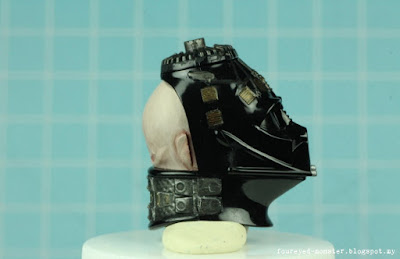
Darth Vader's breath mask without the locking helmet
Gold bits are the helmet's body heat regulators ...
... while the metal bit at the top is the helmet locking system comprising magnetic clamps

In contrast, painting flesh was like riding a bike. I guess the amount of practice I had put in working on flesh tones helped me adapt quicker back into the rhythm of painting with a hand brush. Results wasn't exactly awe inspiring but it's a step back into the path of small scale miniature figure painting. 

Neck support at back of the helmet was painted with metallics and finished with a wash
Back of Vader's exposed breath mask sans locking helmet
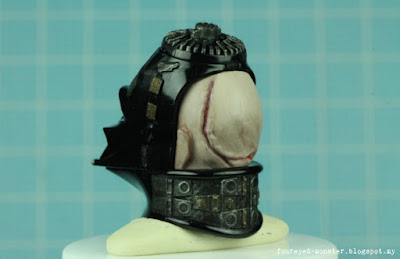
Scars on the back of Vader's head had a reddish brown wash followed by a purple one

At the risk of sounding like a lovesick fanboy, I can't praise the level of details on Bandai's Darth Vader 1/12 scale model kit enough, at least from I've seen so far. Vader's head/helmet/mask looks almost identical to the studio model based on the photo references seen in Star Wars Costumes: The Original Trilogy. Apart from my misgivings about the choice of a rigid plastic cape, the rest of the kit has so far been in Vader's own words ... Impressive, Most Impressive.


Sculpted details on Darth Vader's breath mask is excellent

Below is a quick How-To in painting Vader's pale, sickly, scarred skin using some old Citadel paints and washes I had on hand. It's one of the simpler flesh skin colour mixtures I use as it only involves three acrylic paints and three acrylic washes. The steps involved are as follows:
1. Primer: Tamiya Fine Surface Light Grey Primer, my go-to primer for any skin and most cloth related parts that need painting;
2. Basecoat: A 1:1 mixture of Citadel Tallarn Flesh and Space Wolves Grey;
3. Midtones & Initial Wash: Basecoat mixture with more Space Wolves Grey and some Skull White together with a wash of Dark Flesh and Devlan Mud mainly on the scarred tissue;
4. Highlights & Final Wash: Midtone mixture with even more Skull White and wash of Leviathan Purple mainly on the scarred tissue.     

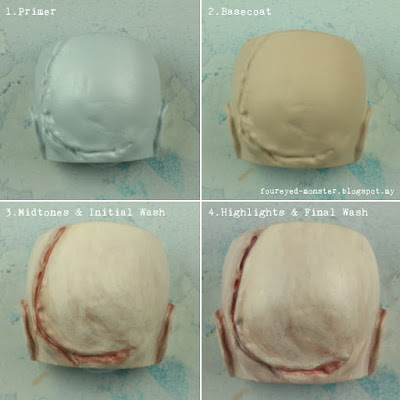
Progression of how the back of Vader's scarred and injured head was painted

So that's Darth Vader's iconic head done and dusted. And as with most Bandai model kits to date, all those details are now hidden by his glossy black helmet. But at least the helmet is still detachable for a pose with the breath mask and back of his head exposed. So all that hard work hasn't necessarily gone to waste. Painting Darth Vader's head should be on the bucket list of every modeller who is a Star Wars fan. And that's a check for me. Now on to Vader's torso, armoured breast plate, et al.


http://shireworks.blogspot.com/https://www.facebook.com/shire.works

Monday 13 June 2016

Star Wars Darth Vader - Bandai 1/12 Scale Model Kit [Unboxing and Pre-Assembly Review]

After nearly three months of working solely on vehicle model kits, I had a hankering to paint miniature figures again. While dithering on which project to actually start work on, I finally decided to slowly ease myself back in by attempting to put together and paint the Bandai 1/12 scale Darth Vader figure. This plastic model kit will allow me to paint clothing (albeit mostly variations of black) and flesh (only the back of his head, but still ...). Both will be welcome after a continuous procession of hull plate spray painting and panel lining. Painting flesh again will be especially gratifying. 

Bandai 1/12 scale plastic model kit of Darth Vader
Side views of the Bandai Darth Vader box art

Two key issues - on extreme opposites of a spectrum - grabbed me straight out of the box. Firstly, Bandai got the most important part of this particular model kit absolutely spot on i.e. Darth Vader's head. The details on the Sith Lord's head are excellent. More importantly, the head's proportions are perfect - way better than most Vader action figures out in the market today. And then comes the least appealing part of the kit - Vader's cape. Hard, rigid plastic pieces just doesn't cut it. Bandai would've been better served with a cloth or soft pliable vinyl version. While it's possible to replace the hard plastic version with a self-made cloth version, it seems like too much work to me.

Bandai Darth Vader instructions, back and front cover
Darth Vader looks to be a fairly straightforward build

All parts come in gloss black except for Vader's lightsaber which comes in clear red plastic. Coupled with either the stickers or water decals supplied with the kit, this plastic model can be completed without the need for any painting at all. However, more experienced modellers may want to paint those parts that need painting for an added realistic look to the completed piece.

Sprue A: Head, chest, groin, etc
Sprue B: Appendages, etc

As disappointing as the cape seemingly is at first glance, it does come in separate parts (see below) which in turn allows for some freedom when posing Vader. Such freedom of movement wouldn't be possible if the cape had come in one big piece. In that respect, Bandai got it right ... well as right as they could've considering their decision to go with rigid plastic pieces for Vader's cape. 

Sprue C1:Parts of the cape and belt
Sprue C2: More parts of the cape, groin, feet, etc

The rest of the parts comprised the connectors, articulation joints and base. And detailed stickers and water decals will be appreciated by hobbyists who don't want to do any painting at all. 

Sprue PCF-6AB: Connectors, articulation joints, misc
Sprue SWB3: Base
Bandai stickers (left) and water decals (right) for the 1/12 scale Darth Vader

All in all, Bandai's 1/12 scale Darth Vader plastic model kit looks like a simple, straightforward project that has the potential to look very good. That's what all the Bandai model kits I have encountered so far - Millennium Falcon, Stormtrooper and Tie Fighter - essentially provide, namely a great sense of achievement with impressive end results regardless of a hobbyist's skill level.

Vader will rise again ... soonish


To try and fulfill the potential that this model kit has, I'm going to forgo the use of water decals and paint Darth Vader instead. Vader will rise but only Sith knows when. Soonish if the force is willing. Until then, Dum Dum Dum, Dum-te-Dum, Dum-te-Dum ...

http://shireworks.blogspot.com/https://www.facebook.com/shire.works

Friday 3 June 2016

Star Wars Millennium Falcon [WIP - Lower Gun Turret with Finn at 1/144 scale]

When I'm painting Bandai's Star Wars model kit parts, especially the ones that barely see the light of day, I've a recurring imaginary scene playing in my mind. It goes like this. There is a group of Bandai product designers huddled over a table giggling and high-fiving each other. One designer then says, let's see those modellers paint this detailed part that's going to be covered up by another part. And then the whole group erupts in uncontrolled laughter. Of course this scene exists only in my mind. But it still doesn't stop me imagining it as I paint yet another soon to be barely visible detailed part.

Bandai 1/144 scale Millennium Falcon work-in-progress: Finn inside the lower gun turret
Finn is seated rather awkwardly to his left as the seat wasn't build to accommodate the figure
Base colours comprised light pastels and shiny metallics to, hopefully, better reflect light

Let's get one thing out of the way. The way Bandai designers and engineers have lovingly reproduced vehicle details from the Star Wars universe demands they be painted. So paint the details I will. But this time around, I sought a compromise in order to reduce the amount of time I'm spending on my Star Wars projects. Based on the assumption that the farther back into the interior, the less visible the details - I painted the bare minimum base colours for the said areas. Most of the details I recreated through paint were located at the front end of the turret interior, nearest to the clear plastic viewport.

Scene that inspired my attempts to paint Finn and the Falcon's lower gun turret

This attempt at the Falcon's lower gun turret interior with Finn seated on the gunner's chair was inspired by The Force Awakens scene in which he flew in the modified Corellian YT-1300 light freighter for the first time. It complements the fact that Rey and Bee-Bee-Ate are in the cockpit.

Lower gun turret seat with 'lighted' controls and leather seating
Finn in all his 1/144 scale glory
The farther back in the lower gun turret interior, the less details painted
Gun turret interior had fairly sparse details as I don't think they were meant to be painted in detail

After all that hard work, the 'heartache process' soon began, i.e. the process of covering up all the hard work done painting the lower gun turret interior and Finn. First was the viewport which as expected obscured part of the view into the Millennium Falcon's lower gun turret interior. Luckily I had used a lot of light pastel as well as metallic colours to basecoat the interior. This meant enough light reflected off the interior to make gun turret retain visibility through the clear plastic viewport.

Structural spokes on the viewports were painted light grey based on ILM reference photos
Back view of the gun turret viewports - painted with black acrylic 'primer'
Finn and the interior is still visible, barely, at this stage of the process

Up next was was the turret's hull plating as well as the gun attachment. By the time everything was in place, Finn and most of the interior was no longer visible from afar. 'Heartache process' - concluded.

Lower gun turret's hull plating attached
Zoomed out view of the lower gun turret with its yet-to-be-weathered hull plating attached
On goes the guns and tadaaa ... Finn dissappears (the three holes are for the base attachment)

To give you an idea of just how big the lower gun turret interior was, I compared it - hull plating, gun and all - to my customary scale comparison tools i.e. paperclip and five sen coin (see below). 

Bandai Millennium Falcon lower gun turret scale comparison to a paperclip and a 5 sen coin

Could I have done a better job with the lower gun turret interior? Probably. Should I have done so. Not really. I did enough to placate my inner 'paint every detail' demons. And that's good enough for me. As you can see from the zoomed out photo above, not much of the painted details remain visible from afar. But it's there and that's the whole point, at least for me. Ohhh ... just one other thing before I sign off. If you happen to see any online ads below my blog posts I would appreciate it if you could click on it occasionally for sponsor messages. It helps generate some income via blogging. Every little bit helps in these tough times. Thanks in advance for your support, and have a good weekend!

Related Posts Plugin for WordPress, Blogger...