Monday 30 September 2013

Lannister Warhorse needs plus one for a tourney

Notwithstanding some nervous moments in what was my first significant attempt at painting a freehand design, I have largely come through the experience relatively unscathed. Fortunately none of the four heraldry designs of House Lannister's lion was messed up beyond recognition. Though not perfect, all four heraldry designs are, at the very least, still fairly similar to and recognisable as the lions you would usually see on a coat of arms in medieval times.  

Lannister Warhorse, hear me ... neigh?

More work was done on the warhorse in the way of highlights. So the cloth had the brightest red in my arsenal painted on the edges; the warhorse's tail got some grey highlights; while warhorse itself and it's leather straps received GW Bestial Brown and Snakebite Leather highlights respectively.

More highlighting work was done on the red cloth, leather straps and horse

Incidentally, this was also the first horse I ever painted. But I guess it doesn't really count as most of the warhorse is covered with armour and cloth.

Front (left) and back (right) views of the Lannister Warhorse

Now all that the warhorse needs is a knight to ride him to a jousting tournament. However, work hasn't really started with the Lannister Knight. As you can see below, to date most of him is just white undercoat. From the looks of it, there might be space for another three to four heraldry designs.

A Lannister Knight to be

I hope the knight will be as fun to paint as the warhorse has been. If I can do a good job with the Lannister Knight, it will give me the boost I need to go on and complete a further seven knights from the various other Houses found in the Game of Thrones realm. This project might seem a tad too ambitious for a painter of my skill level but by doing it I I hope to get better at painting freehand. 


Thursday 26 September 2013

Early days of a Lannister Warhorse

Progress on my Game of Thrones Lannister Knight project is still at the very early stages with work primarily concentrated on preparing the canvas for my first serious attempt at painting a complicated freehand design on miniature. With the shield-like emblem measuring just 12 mm by 15 mm, I was first tempted to just use a decal for the heraldry. However, I couldn't find any suitable ones hence my hand was forced and it was either abandon the project or suck it up and try some freehand painting.

Freehand painting of the House of Lannister heraldry

Before making the freehand attempt, I had practised drawing and painting the heraldry for House Lannister on a piece of paper in order to try and build some muscle memory into my hands. Having completed one of the four freehand heraldry designs on the warhorse so far, I must say it is turning out better than I could have ever hoped for. Taking into account, the scale and the unevenness of the 'miniature canvas' involved, I am quite content with the results so far.

Programming muscle memory into my hands with some doodling practice

As for the rest of the warhorse, more work needs to be done especially in the highlights department. That is something I will be tweaking as I go along but most of my effort will go into painting the freehand heraldry designs because if I mess those up, it won't matter one bit how the rest of the warhorse is painted. It also serves as an excuse to get in some badly needed freehand practice.

One Lannister heraldry down ... three to go
Work on the rest of the warhorse still in need of fine-tuning

If all goes well, I should complete the Lannister Warhorse soon before starting work on the knight proper. Thanks for checking out my progress on the Game of Thrones Lannister Knight. Stay safe!

Monday 23 September 2013

A pumpkin, some candy and autumn leaves

With Halloween just around the corner, my Zombie Girl project takes on an unintended significance.  Despite never having celebrated Halloween, I have always been fascinated with this and all other festivals of the dead that contain pagan roots, and which are practiced by cultures all over the world. I guess it is one way humans have dealt with the great unknown throughout the centuries.   

Jack O'Lantern with some zombie blood

My Knight Models Zombie Girl project begins with the highly detailed base which comprises the Jack O'Lantern pumpkin carving, some Halloween candy and autumn leaves on a road. When painting the base, I had tried to pay very close attention to the details. This meant painting the leaves to reflect the period in which Halloween is usually celebrated i.e. autumn and the candy that is synonymous with the celebrations, both the outer wrappings and the aluminium foil inside.  

Overhead view of the Knight Models Zombie Girl base (without the pumpkin)

For the candy, I went for two particular ones that had instantly recognisable colour schemes ... to me at least as I love the Reese's Milk Chocolate Peanut Butter Cups and Nestle Crunch ... mixed in among generic candy wrappers. For the leaves, I referenced an assortment of autumn period maple leaves that had colours ranging from greenish yellow to brown to orange to red.  

I chose the Reese's and Crunch candy bars for their iconic and easily recognisable colours
Colours of autumn seen in maple leaves

To understand the difficulty I had in creating a close as possible likeness for the candy bars, it is perhaps best to show you the scale I was working with. To that end, my trusty 31 mm paperclip makes yet another appearance to show the comparative size / scale of the base.

Knight Models Zombie Girl base next to a 31 mm paperclip

Dry-fitting the pumpkin and base together gives you an idea on the mood being set for the Zombie Girl to follow. I plan to superglue her to the base prior to painting as the Zombie Girl is too heavy and thus will be unstable if placed on blue tack. An alternative would be to pin her with metal rods (paperclips) to a cork base but I don't think that is a viable method for her.

Knight Models Zombie Girl Base sans ... well .... the zombie
Overhead view of the Knight Models Zombie Girl base

I am now left with the main piece to paint. Getting a realistic looking zombie skin tone (yes I know how oxymoronic that statement is) is going to be very tough. If I don't pull it off, the end result will be a cartoon-like zombie which is far from the creepy realism that I am aiming for.

Work to begin soon on the Knight Models Zombie Girl

As a personal challenge, the countdown begins for me to finish this before October 31 on which Halloween falls. That leaves me with only slightly more than a month to finish the Zombie Girl. Even if I don't make the deadline, I should at least finish most of her paint job. That is the plan anyway.


Friday 20 September 2013

Quick look at Knight Models miniatures

Throughout my journey as a miniature hobbyist thus far, I am slowly discovering that many popular characters I would like to see produced as miniature model kits for painting either may not yet exist ... or are extremely hard to locate. For example, miniatures in my paint-wishlist range from anime characters such as 'K-On!' or 'Soul Eater' to sci-fi stuff such as the Star Trek Original Series cast members. With Knight Models miniatures, I can at least check off two things on my wishlist i.e. a zombie child (weird I know but I will explain the why later) and comic book superheroes.

Knight Models Iron Man Special Edition packaging

Tony Stark in an iron suit, what is there not to love. The missus digs the goatee while me, I love the armour that he rides in. It is ironic that the Knight Models Iron Man Special Edition (S.E.) comes as an all white metal model kit ... iron ... metal ... get it? ... but it felt right to have an Iron Man miniature with some weight to it as is expected of metal miniatures. The Knight Models Iron Man S.E. will give me the opportunity to try out the non-metallic metal (NMM) technique, a skill I initially dismissed as being unnecessary but I have come to realise that NMM has its place in a painter's repertoire.

Iron Man Special Edition un-boxed
White metal parts of the Knight Models Iron Man Special Edition

Meanwhile, another Knight Models miniature that I will be working on is the Zombie Girl from its Terror Series. I have been searching for a long time for a miniature that I felt best portrayed all that is  terrifying about a zombie namely the perversion of what we hold to be normalcy in our everyday lives. To me at least, nothing depicts that better than an innocent child who has become a zombie. Is a huge zombie monster scary? Meh. But for a child to become a zombie is both sad and creepy.

Knight Models Terror Series featuring the Zombie Girl
Knight Models Zombie Girl un-boxed
The Zombie Girl also comprises white metal parts

Moreover, ever since that zombie girl scene (see below) from Season One of the Walking Dead series, I have been completely sold on the idea of a zombie girl miniature. While the Zombie Girl stands at around 60 mm being at 1/28th scale, most of the other Knight Models miniatures range from 70 mm to 90 mm, also at 1/28th scale. 

A scene from the Walking Dead, Season One

So far, I have only managed to assemble and prime one of the two Knight Models miniatures that I am currently working on. This time around, I got a reasonably good primer coat sprayed on so hopefully that will translate to a smoother painting experience in the later stages.

As she was only dry fitted to the base, the Zombie Girl actually started to tilt sideways as this shot was taken
Knight Models Zombie Girl - primed and ready to be painted

Fingers crossed, I will be able to get some work-in-progress shots taken soon so I should have those photos up in a future blog post soonish. Till then, stay well and happy!


Tuesday 17 September 2013

Anime Review: From Up on Poppy Hill

In a weird coincidence, shortly after my 100th blog post salute to my creative inspiration Hayao Miyazaki-sama, a press conference in Tokyo was held for him to announce his retirement. He reportedly said his eye sight was getting worse, making it hard for him to create his animation. It is indeed sad news and goes to show how me must treasure the good health we have now and not put off for another day what we can create today. It seemed fitting that I revisit a fairly recent Studio Ghibli animation and post up a review, seen partly through the viewpoint of a miniature painter.

"From Up on Poppy Hill", a Studio Ghibli animation

At its core, 'From Up on Poppy Hill' is a romantic drama set in 1963 Yokohama, Japan. Told mainly through the eyes of a 16-year-old school girl named Umi Matsuzaki, the film explores the budding teenage romance with her schoolmate Shun Kazama as well as a period of social change in Japan. Though written by Hayao Miyazaki and directed by his son Goro, the story is actually based on a manga by Chizuru Takahashi and Tetsuro Sayama.

Shun meets Umi for the first time
 
A New York Times review states that the movie's "emotional impact comes from the way everyday life is washed in the colors of memory". I couldn't have said it better myself. Colours in 'From Up on Poppy Hill' are used in a very simple manner but to great effect. In this movie, I found myself observing the background art work just as keenly as I did the main character animations.  

Night scene in Yokohama circa 1963, lighted with a warm orange/yellow glow

In an interview, Goro mentioned one lesson he had learned from his father was not to draw from photographs as one would only produce mimicry. Instead, Goro seeks to apply his father's teachings by drawing from the mind (or memories). Perhaps as miniature painters we can gain something from this wisdom. Sometimes, trying to paint using a how-to-guide doesn't quite work as well as it should. 

Loving attention to detail is the hallmark of a Studio Ghibli production - Umi seen here in the school clubhouse

As there are surprising twists to the plot, I do not wish to delve too much into the story for fear of spoilers for those of you who have yet to experience this movie. Suffice to say, "From Up on Poppy Hill" manages to mingle both sadness and optimism in just the right amounts so as keep this take on teenage love very fresh and enjoyable. For lack of a better description, the movie made me feel cosy ... sort of like drinking a hot cup of chocolate milk in a cold and rainy day ... while at the same time dragging me on an emotional roller coaster. This is one movie I highly recommend.

A romantic drama is never complete without the umbrella/rain scene

All told, this is a lovely nostalgic piece of story telling that documents the awkwardness of first love in a simple but heart-warming manner. Speaking of which, I would like to dedicate this mini review to my own high school sweetheart (and missus) for over 20 years.

Wednesday 11 September 2013

Jotnar's Bane - Troll Hunter [Completed]

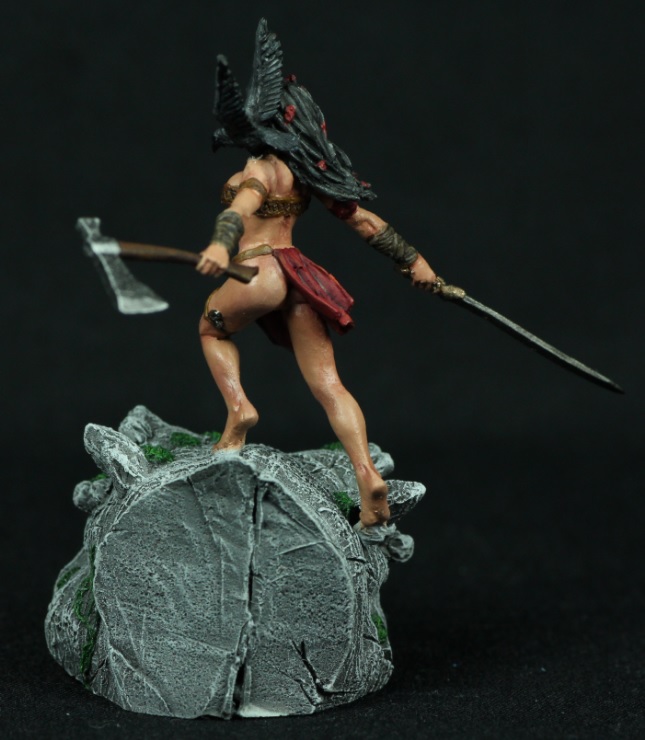
Ax Faction's Troll Hunter was a simple yet delightful resin model kit which I had fun painting. Rather than do something drastically different from how she is depicted in the Ax Faction website, I decided to replicate the 'official' colour scheme because it allowed me to try painting a darker skin tone as well as attempt to paint voluminous black hair. Both characteristics were in keeping with my aim to, if possible, try something new in each and every miniature that I paint.

Ax Faction Jotnar's Bane aka Troll Hunter

Thankfully, I am slowly but surely getting the hang of painting the eyes of miniatures. With practice comes muscle memory and the experience in knowing how much pressure to apply when painting the whites of the eyes. This should stand me in good stead when I attempt to paint coloured irises and eye lens reflections on a more regular basis, something I consciously left out for this miniature.

The raven is barely hanging on to the troll hunter's shoulder

PAINTING TIP: When painting eyes, it also helps to mix the paint with a high ratio of flow enhancer / improver because this allows the paint to adhere to the eyes without applying too much pressure from the brush. In my experience, this is important because more often than not, using too much pressure when painting the miniature's eyes is the cause of most mistakes.

Side view (left) - Jotnar's Bane aka Troll Hunter

There was also much less chalkiness in the skin tone, courtesy of a higher ratio of flow improver / enhancer mixed into the paints. A minor drawback to this is the slight glossiness to the skin. Since the Troll Hunter is supposed to be a barbarian, a class that is synonymous with oiled skin, I guess that glossiness of her skin is not too out of place in the miniature's overall look. 

Being a female barbarian, the troll hunter likes to oil her skin prior to battle

For this dark skin tone, I kept it very simple and only used three colours - Bugman's Glow, Cadian Fleshtone and Bleached Bone - mixed to varying degrees. I had contemplated adding a very light green glaze to depict the green veins that you can spot naturally on lighter skin but decided against it at the last minute as I thought it would clash with the oiled skin look I had going for me.

Can you spot the red roses in her hair?

Something I didn't realise until now was the fact that I had never painted black hair before. So being faced with a black feathered raven and a black haired troll hunter meant I couldn't avoid the issue for this painting project. To add volume and depth to the black feathers and hair, I painted a myriad of grey shades against a black basecoat and topped out with a black wash.  

Volume to her hair and depth to the raven's feathers

Her loincloth was painted red to bring out her dark skin. While I did toy with the idea to give her yellow clothing, I guess it was always going to be red. After all, it does match the roses in her hair.

Side view (right) - Jotnar's Bane aka Troll Hunter

With more experience under my belt, I am very much looking forward to future painting projects. With the constant rain this past week, I haven't really dared to prime any miniatures for fear of having the humidity wreck havoc on my primer undercoat. The bad weather does, however, force me to spent more time on the preparation stage (prior to priming), something I always seem to rush through.

Troll head in the midst of petrification

To avoid jinxing it, I won't mention what mini I will be working on next. But it's something I have always wanted to work on, and I believe I have finally found the perfect miniature for it. Hopefully, I can get it assembled and primed by next week so stay tuned for some undead revelations. 


Monday 9 September 2013

Ax Faction Jotnar's Bane [WIP - Troll Head]

Work on my Ax Faction project begins with the completion of the Jotnar's Bane base which is a dead Troll's head. With the general folklore stating that trolls turn into stone either when dead or when exposed to sunlight, it was a no-brainer to paint the troll head to mimic a rocky/stone formation. For me, the moss on the head is more of an indication that this is a forest troll rather than to suggest the troll has been dead for a long time. I took this approach as I wanted to depict a troll that had just died.

Troll's head that serves as the base for Jotnar's Bane (Ax Faction)
Green moss is an indication that this is a forest troll
Troll head (side view, left)

Portraying a troll that has just been killed by a hunter allowed me to add some variety to the troll head's colour scheme. If you look closely, you will notice that the troll's eyes, teeth and tongue have been painted with muted colours to show as if they are in the process of turning into stone. For the troll's eyes, I added a further dimension by painting them (or trying to anyway) to look cloudy ... kind of like how eyes would look on a dead zombie i.e. accelerated decomposition prior to petrification.


Troll head (side view, right)
Muted colours of eyes, teeth and tongue depict troll is in the midst of turning to stone
Top view of the troll's head

Completion of the base leaves me with just the troll hunter herself to paint. Hopefully I can get most of the job done before the week is over and post up some pictures by the next post.

Jotnar's bane aka the Troll Hunter ... primed and ready for paint

As always, thanks for reading. Till the next update, may you be well and happy. 


Related Posts Plugin for WordPress, Blogger...