Friday 28 June 2013

Painting the face of Abbadon the Despoiler

Abbadon the Despoiler was one of the very first Games Workshop miniatures I got to complement my Chaos Space Marine Battleforce set. But I never had the confidence to attempt painting my Chaos army HQ ... until now, seeing that I needed to chalk up some practice time in painting faces anyway. In search of the best way to paint faces, I will be trying out many different approaches used by wonderfully talented painters such as Jennifer Haley, Marike Reimer and others. But for Abbadon, I decided to try out an advanced 'Eavy Metal technique. While the method was meant for normal human skin as opposed to warp tainted flesh, I used it anyway for a pre-Heresy Abbadon look.   

Front profile of Abbadon the Despoiler's face
Left profile of Abbadon's face
Right profile of Abbadon's face

For those who might be unfamiliar with the scale I was working with, I took a photo (see below) of the miniature's head together with a 31 mm paper clip and the smallest coin in the Malaysian currency. Surprisingly I did not have to use any form of optical magnification when painting the face, although going forward I may have to, in order to paint more realistic looking eyes with coloured irises and reflections of light. That, however, is a more advanced technique which I have yet to try.


Using the 'Heavy Metal Masterclass Guide to Painting Faces
If you are looking for the original Games Workshop guide to painting faces, a quick search via Google should lead you to the PDF file. In the steps below, I will be showing more of the things I did wrong (and right) when attempting to use the Masterclass guide to paint Abbadon's face.


Step 1: Painting a basecoat of Tallarn flesh on face was fairly straightforward step. In my case, I used the Light Grey Tamiya Fine Surface Primer for the undercoat.

Step 2: Another fairly easy step whereby a very thin wash of Dark Flesh was applied all over the face and the wash was allowed to pool in the recesses. I was still happy with myself at this point.  

Step 3: This step called for a second wash comprising a mix of Scorched Brown and Chaos Black. But I fumbled big time in this step as I applied the wash on too thickly. My bad.

Step 4: A first mid-tone layer comprising a 2:1:1 mix of Tallarn Flesh, Fortress Grey and Bleached Bone was applied to all areas except the recessed areas. After I completed this step, I could hardly notice much of the first wash of Dark Flesh. But that was entirely my fault for bungling Step 3.


Step 5: The second mid-tone layer was a 1:1 mix of Tallarn Flesh and Bleached Bone. I thought I did rather ok at this step. At the very least, it built a foundation for Step 6, so a pat on the back for me.

Step 6: A final mid-tone layer of pure Bleached Bone was applied only to raised areas of the face and at this stage, I could make out some depth to the face. More back slapping for me then.

Step 7: This step required a wash, mixed from equal parts Bleached Bone and Regal Blue, to be painted around the eyes. However, I modified the step slightly by using less Regal Blue. Similarly, for the suggested step of using a 1:1 wash of Scab Red and Bleached Bone on the bottom lip, I used less Scab Red to prevent it from looking too red.

Step 8: Finally, a final highlight of Skull White was painted on the most prominent areas of the face. In addition, I painted a thin glaze of Skull White on the lips to further reduce the redness. In this step, I also painted the eyes a very simple black pupil on white sclera. As I mentioned earlier, yet more advance techniques actually suggest painting the iris of the eye as well as light reflections, but I decided to leave that for another miniature and not try it on Abbadon. 

Conclusion: I was happy with the final result but there is definitely room for improvement  if I am to achieve more realistic skin tones and eyes. That means trying out new methods and practising existing ones. As for Abbadon, the rest of his body awaits painting.  

Wednesday 26 June 2013

About turn, left, left, left, right, left ...

Just a short non-hobby related post in which I would like to give a shout out to my son whose scout team came in third in a school district level marching competition. He did way better than his old man ever could. I still retain horrid memories of my scout drill master who, as punishment, made us stand on one leg in front of a nearby girls school. In his defense, we were terrible at marching and had the coordination of a herd of antelopes running away from a cheetah. Ahhh the memories.   

The Imperial March
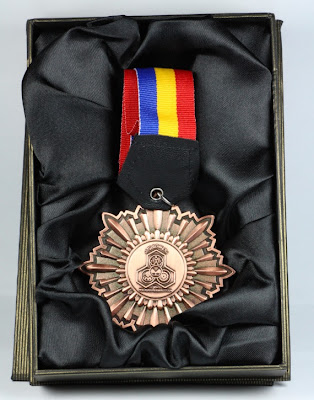
Oooo ... shiny and nice looking medal

Side note on Malaysia's worst haze/smog in 16 years
Lately, with the environment being as bad as it is, I am not really getting much done hobby-wise. I am literally choking on the air that I breath and it kinda kills the mood for painting and such.

Reuters Photo by Bazuki M. on the air pollution in Kuala Lumpur

That's it for this very short post. Hope you are enjoying blue skies where you are at.

Saturday 22 June 2013

Testing the Waters (Part 2/2) - Using epoxy resin to make water in a diorama

In the first part of my initial attempt at creating realistic water in a miniature diorama, I had outlined the steps involved in constructing the "vessel" to contain the body of water as well as painting a colour scheme for water found in still ponds or hot springs. To "make" the water, I used the Tamiya Clear Epoxy Resin, which just happened to be the most convenient product available at the time. In the future, I might try the Woodland Scenics Realistic Water but it's the Tamiya one for this project.  

Tamiya Clear Epoxy Resin was used to "make" water
Add resin and hardener in a 2:1 mixture and stir

Detailed instructions were included in the box and they specifically called for the use of a weighing scale to measure out the 2:1 ratio needed the mixture of resin to hardener. As I did not have a scale with a display of 1 gram increments I had to improvise by measuring the ratio using volume instead of weight. Please note this is not the proper way to do it because both the resin and hardener would have different densities. The mixture was stirred well before it was poured into the shallow hole.

Resin and hardener mixture was poured into the shallow hole

Tamiya recommends using its enamel paints to colour the resin mixture. But I decided to try using Citadel acrylic paints instead and they seemed to work well enough though only time will tell for sure if there are any side effects to using acrylic paint on the Tamiya epoxy resin. In this project, I used a clear epoxy resin for the water and not the coloured epoxy resin as I was unsure of the side effects.

Before adding paint (left); after adding paint (right)

With temperatures reaching as high as 35 degrees Celsius where I'm at, the epoxy resin hardened enough to be removed from the "mould" within six hours of mixing the resin and hardener. But it is best to leave it for about 24 hours to ensure proper hardening. There is a possibility I may have added too much hardener because the final epoxy resin product looked a tad cloudy (a known side effect).

Hardened clear epoxy resin
Hardened epoxy resin with Citadel acrylic paint added to it (or is it Kryptonite?)

Final results were a mixed bag of nuts (see pictures below). It was fairly realistic for still or even very slow moving water. However, it did lack the "wow" factor of say ripples or small waves to depict at least some movement of water. Other than that, I was fairly happy with the outcome.    

After epoxy resin had hardened: Realistic looking still water
Front and back views of the pond / hotspring
 
I had attempted to sculpt some waves on the epoxy while it was in the process of drying - done at hourly intervals to determine at which stage the epoxy was the most pliable. Unfortunately, I was unsuccessful as the epoxy resin always resumed its original shape after I had tried sculpting it.

A quick search online shows that there are in fact better alternatives:
(a) Make a mould of sea waves out of silicone for the epoxy resin to set in. But needless to say, my skill level is way too low to try this technique.
(b) Use another chemical product such as the Woodland Scenics Water Effects which can be applied on top of the hardened epoxy resin. This is one option I am considering for future projects.

Thanks for reading and until the next post, stay happy and well. 

Thursday 20 June 2013

Testing the Waters (Part 1/2) - Laying the groundwork for making water in a diorama

One vivid childhood memory I have was of me walking into a small hobby shop and being awe struck by the many World War II dioramas on display. One particular diorama grabbed my attention and just wouldn't let go because the modeller had constructed realistic looking water as part of the scene. To a little kid with no knowledge whatsoever of the hobby, the thought that something like that could be done was simply mind blowing. Now three decades later, I am having a go at simulating a still water scene for a mini diorama which might be used for some miniature projects in the future.


IKEA Heat - Pot stands made from cork, which form an ideal base for the mini diorama

Firstly, I cut out a section from IKEA's cork pot stand for use as the base for my mini water diorama. Using a pencil, I then outlined the fringes of what will be a small pool of water (more of a pond or hot spring) before carving out a shallow hole with a hobby knife, up to a depth of about 5 mm.  

A section of the cork was cut off and then a shallow hole was outlined before being dug out using a hobby knife

Following this, I added some bits and pieces of scenery comprising smooth pebbles into the floor of the pond/hot spring while laying more jagged edge rocks on the edges. I also used pieces of the cork to create two rock bases on either side of the pond/hot spring as well as add sand on the flat areas.

With all the pieces glued on, it was ready for paint
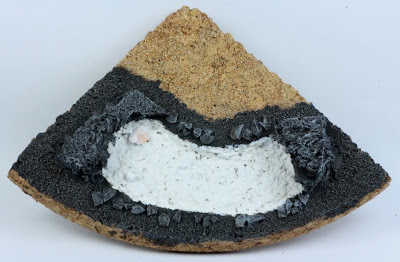
For the basecoat, I used a mixture of Chaos Black:Adeptus Battlegrey on the rocks and surrounding land area while Skull White was applied on the pond/hot spring. Both the rocks and land area were then given two coats of drybrush i.e. Codex Grey followed by Fortress Grey. Meanwhile, an additional step consisting of a Devlan Mud wash was applied to the land area.

Aiming for a huge contrast in the basecoat application
A combination of drybrushing and washing techniques

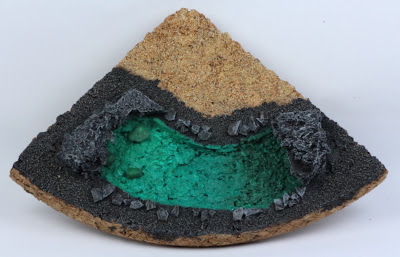
Next up was the colour scheme for the water. There was a lot of experimenting done before I finally decided to opt for greenish looking water to stimulate either a still pond or hot spring with algae. To achieve this effect, I mainly used three Citadel colours namely Dark Angel Green, Hawk Turquoise and Scorpion Green. A couple of layers comprising a mixture of Hawk Turquoise with a little bit of Scorpion Green was then applied on top of the Skull White in the water section.

Possible acrylic paint colours for depicting water in a miniature diorama
Basecoat for water

What I was trying to achieve was a hot spring water effect in which geothermally warmed water was seeping out from the deeper end on the right side, and flowing towards the shallower end on the left side. Hence, I painted a transition of darker to lighter colours from right to left. Hawk Turquoise was the main colour with Scorpion Green added to stimulate the shallow end while Dark Angle Green was added to stimulate the deeper end.

Paint job completed and mini diorama is ready for the next step - epoxy resin

In hindsight, I should have added more green to the overall colour scheme. Definitely something to consider for future attempts at painting realistic water. With the paint job completed, the next step involves the use of chemicals to stimulate the actual body of water. That will be covered in Part 2.

Click on this link to go to Part 2.

Saturday 15 June 2013

Review: My first Dark Sword miniatures

In a quest to continually improve my painting skills, I am always on the lookout for well sculpted miniatures that are more natural and life-like, especially those in the fantasy/historical/medieval genre. Miniatures of human sculptures are less forgiving on a bad paint job versus say an ork as the human eye has been conditioned to expect certain things on a painted human form (realistic skintone, eyes, etc) thus forcing me to improve my skills. My collection of Games Workshop alternatives was limited to Kingdom Death miniatures but I have now managed to add some Dark Sword stuff to my collection.    

Miniatures from Dark Sword's Masterworks Elmore and Vision of Fantasy line

This batch of Dark Sword miniatures was ordered online and I was happy with the packaging that the metal miniatures came in. Having the sponge in the package itself to give added protection was a nice little touch. I was also impressed with the fine details in the very well sculpted miniatures, which come in sizes ranging from 28 mm to 32 mm to 54 mm.     

Closeup of the Female Elven Princess in its secure packaging

With little experience in working with metal figures, I had some trouble spotting mould lines which are harder to see in the shiny metal surface. But thankfully, there weren't many mould lines to begin with. Moreover, some of the figures were sculpted with minimal assembly required. Both characteristics endeared me even more to the miniatures. Most importantly, I feel that they are priced reasonably for such good quality and finely detailed models with prices starting from US$7.99.

Female bard with lute: Before and after priming
Female mage on stairs: Before and after priming

In addition, I got two Dark Sword miniatures from the George R.R. Martin Masterworks series. Finding myself with more time on my hands has allowed me to start reading the Game of Thrones books (still on Book 1 so no spoilers please) that I hadn't had time for previously. Needless to say, with books I read being a major influence on what I like to paint and with me seemingly attracted to painting "bad guys", who else than the Lannister twins to start me off on this potentially huge project.

Lannister twins will kickstart my Game of Thrones project

So far, I have only worked on the miniatures up to the priming stage. Nonetheless, I am already a huge fan of the Dark Sword miniatures. I also found two other miniature companies with beautifully sculpted miniatures, one in Spain and one in France.The devil is in the details, and like Dark Sword Miniatures, both the Spanish and French companies have wonderfully detailed miniatures. I will touch more on the products of these two European companies in later blog posts.


Being a painter first and a gamer ... well I have not gamed at all yet ... it looks like I will be looking to expand my paint collection next. I have the Vallejo Model Colours and the Reaper Paint triads, next in my sights, and I believe they will complement my Citadel acrylic paints nicely. That too will be a story for another day.

Wednesday 12 June 2013

WIP: Black Legion Forgefiend

Over the past week, I managed to get some more work done on my Black Legion Forgefiend albeit at a very slow pace due to the highly detailed miniature. Below are some work-in-progress shots that I took in between my painting sessions. My apologies on the badly lighted photos - I was a tad tired out from the painting sessions when I took the shots resulting in, unforgivably, less attention being paid to the lighting hence causing muted looking shots. I hope to do better for the completed mini.


On the Forgefiend's exhaust/furnace section, I decided to go for the metallic cum organic look, the result of which you see on the above photos. Originally I had intended to leave more red and orange showing in the mouth and eyes of the skull but settled for a more realistic look and what a furnace would look like in full blast (see photo below). I am planning to paint some pure white into the furnace section in order to add more contrast to the overall furnace effect.

An actual furnace at work

Another part of the Black Legion Forgefiend that I found myself spending a lot of time on was the flesh and muscles covering its mechanical leg and forearms. Here, I was trying to paint them to look like necrotising or dying flesh. It took about two different layers of colour and two different washes, not necessarily in that order, to achieve the effect I wanted.

Forgefiend's mechanical legs and forearms covered with necrotising flesh

For the tube coverings, I kept things as simple as possible partly because I got mentally exhausted from painting all the details of the Forgefiend. These tubes run all the way from the neck to certain parts under the torso before ending up at the tail. The coverings were painted to look like living skin.

Forgefiend neck section

Forgefiend tail section

Top of the list for the most infuriating thing to paint for the Black Legion Forgefiend was its trimmings and the line highlighting surrounding the trimmings. However, one good thing came out of this exercise - it allowed me to practise painting thin lines and to a certain extent has helped build some muscle memory into my hands (in terms of painting strokes).

Lines and more lines

Thus far, the part I have most neglected is the Forgefiend's front lower part of its torso, which still has a lot of work ahead of it, be it line highlighting or some furnace-like effect on the "vents".

Lower part of the front torso is unpainted

Other than that, the two head and weapon options also are in various stages of completion.

Like the front torso, both of the Forgefiend's heads remain largely unpainted

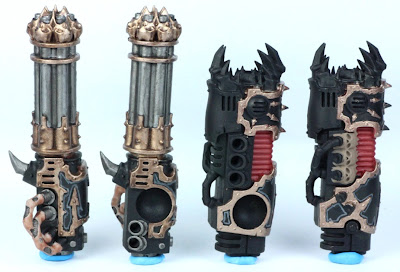
Much better progress on weapons but also in need of much love and attention

Thanks for checking out my WIP photos on the Black Legion Forgefiend. If you have any criticisms or feedback on the uncompleted paint job, please feel free to do so. For example, the missus thinks the exhaust/furnace looks too yellow so as I mentioned earlier, I am contemplating some whites for contrast. Till next time, may the Hobby Gods always steady your painting hand.


Friday 7 June 2013

Father & son project ... take two!

After more than a year of being ignored, the two Ork Boyz were taken from the shelf and dusted off for the resumption of a small father and son W40K painting project. Feeling bored during his school holidays, my son had asked if he could continue painting his Ork Boyz. So that meant putting all my other miniature projects temporarily on hold to help nurture his interest in miniature painting. In this project, I painted one of the Ork Boyz as a guide while my son painted the other.

Without a doubt, Darth Vader is the ultimate Geek Dad

If you are a fan you would have realised the cartoon image above is actually a humorous take of a classic line from the Star Wars movies. The image was taken from a book written by Jeffrey Brown called "Darth Vader and Son". I kinda regret not getting this book from a local bookstore when it was previously on sale. You can check out a review of the book on a Wired article titled Darth Vader and Son imagines the Sith Lord as a doting dad. The book's cover is shown below.


Darth Vader is the coolest geek dad a Jedi could hope for. If you ask me, Luke should have joined Lord Vader and ruled the galaxy as father and son. =)


Anyway, back to my mini geek-dad and son project involving two Ork Boyz. So with his interest rekindled, albeit briefly, both of us resumed painting our orks, which were at the basecoat stage. With fun being the project's main criteria, we didn't set out to paint the miniatures to a high standard. Both minis may not be table-top quality but it was enough that he was having fun slopping on paint.

Can you guess who painted which Ork?
Back view of the Ork Boyz

As you can see, the bases aren't done yet but they are going back in cold storage till, hopefully, he gets the painting bug again and we can resume take three of the project. But with any luck, it won't take another year before that happens. It is never good forcing kids to do something as they will just end up hating it so the Ork Boyz can wait. Hmmm what would Lord Vader have done?

Monday 3 June 2013

How to paint Black Legion colours

Guilt at neglecting my Chaos army saw me resuming work on the Black Legion Forgefiend, which has been a pleasure to paint so far despite the insane amount of mind-numbing and repetitive details, especially the armour trimmings found throughout the miniature. Painting the Forgefiend has also allowed me to practice painting stylised line highlights to accompany the trimmings. As I was taking work-in-progress (WIP) shots anyway, I did a tutorial on how to paint a Black Legion colour scheme. I hope this will be of help to new painters who have chosen the Black Legion as their first army.

Step 1: Undercoat with chaos black


Duh! That was pretty obvious. Since in most cases a miniature from the Black Legion army would be covered mainly in black armour, it makes sense to undercoat it with black. Here, I used the Chaos Black spray-can to achieve a smooth layer of undercoat. It would be preferable to using a brush-on primer as the model is quite large in size.

Step 2: Basecoat armour trimmings


A 1:1 mixture of Scorched Brown (Rhinox Hide):Runelord Brass was used to basecoat the armour trimmings. For me, having Scorched Brown in the mixture served two purposes i.e. it allowed for a better application to the undercoat (paint sticks better) as well as enabled a darker hue of the Runelord Brass which will serve as the shadow for the metal.

Step 3: First layer on armour trimmings


Next, a layer of pure Runelord Brass was painted on the trimmings while leaving the basecoat layer showing in the deep recesses. This provides an initial level of depth to the armour.

Step 4: Wash armour trimmings and selectively re-layer


After the first layer has dried, wash the armour trimmings with Devlan Mud (Agrax Earthshade) to give an additional level of depth to armour. Following the wash, re-paint the edges or upraised areas of the armour trimmings with Runelord Brass to re-establish the highlights. As I did not want my Forgefiend to be too shiny, that was the extent of my metal highlights.

Step 5: Line highlighting


Finally, I opted for a more stylised line highlighting as opposed to a realistic layered highlights on the black armour to achieve even more depth. As such, I mixed Codex Grey (Dawnstone) with some flow enhancer to reduce the surface tension of the paint and make it easier for it to leave my brush without too much pressure. When doing line highlighting it would be easier to do the strokes quickly rather than slowly because the slower your brush strokes the more mistakes you are likely to make. You can still achieve the realism of layered highlights by being selective of where you put your line highlights but for this instance I was going more for style than realism.

Surprisingly, I am rather physced up about completing the paint job for the Black Legion Forgefiend. It turned out to be more fun to paint than I had anticipated. With a bit of luck, I should be able to finish painting a large portion of the Forgefiend before the week is out and post some WIP pictures. Thanks for reading and have a good hobby week!
Related Posts Plugin for WordPress, Blogger...